The Complete CalcWidgets Setup Guide: From Sign-Up to Your First Embed
End-to-end walkthrough — signup, the four-step onboarding wizard, dashboard tour, branding, choosing calculators, generating embed code, and installing it on WordPress, Wix, Squarespace, Shopify, or any custom site. With screenshots of every step.
This is the long version of the question we get most often: "I just signed up — what do I actually click to get a calculator live on my site?"
By the end of this guide you will have:
- A CalcWidgets account on your own subdomain (e.g.
yourbusiness.calcwidgets.com) - A handful of calculators chosen for your market (AU, NZ, or US) and your specialty
- Your brand colours, logo, and call-to-action button applied
- A copy-paste embed snippet for your platform (WordPress, Wix, Squarespace, Shopify, or anything else)
- The calculator visibly rendering on your live website
If you have already signed up and just want the embed bit, jump to Part 5 — Generating Your Embed Code. If you're starting from scratch, keep reading.
Part 1 — Create your account (about 2 minutes)
Head to calcwidgets.com and click Get Started (or go straight to /signup).
You will see this form:
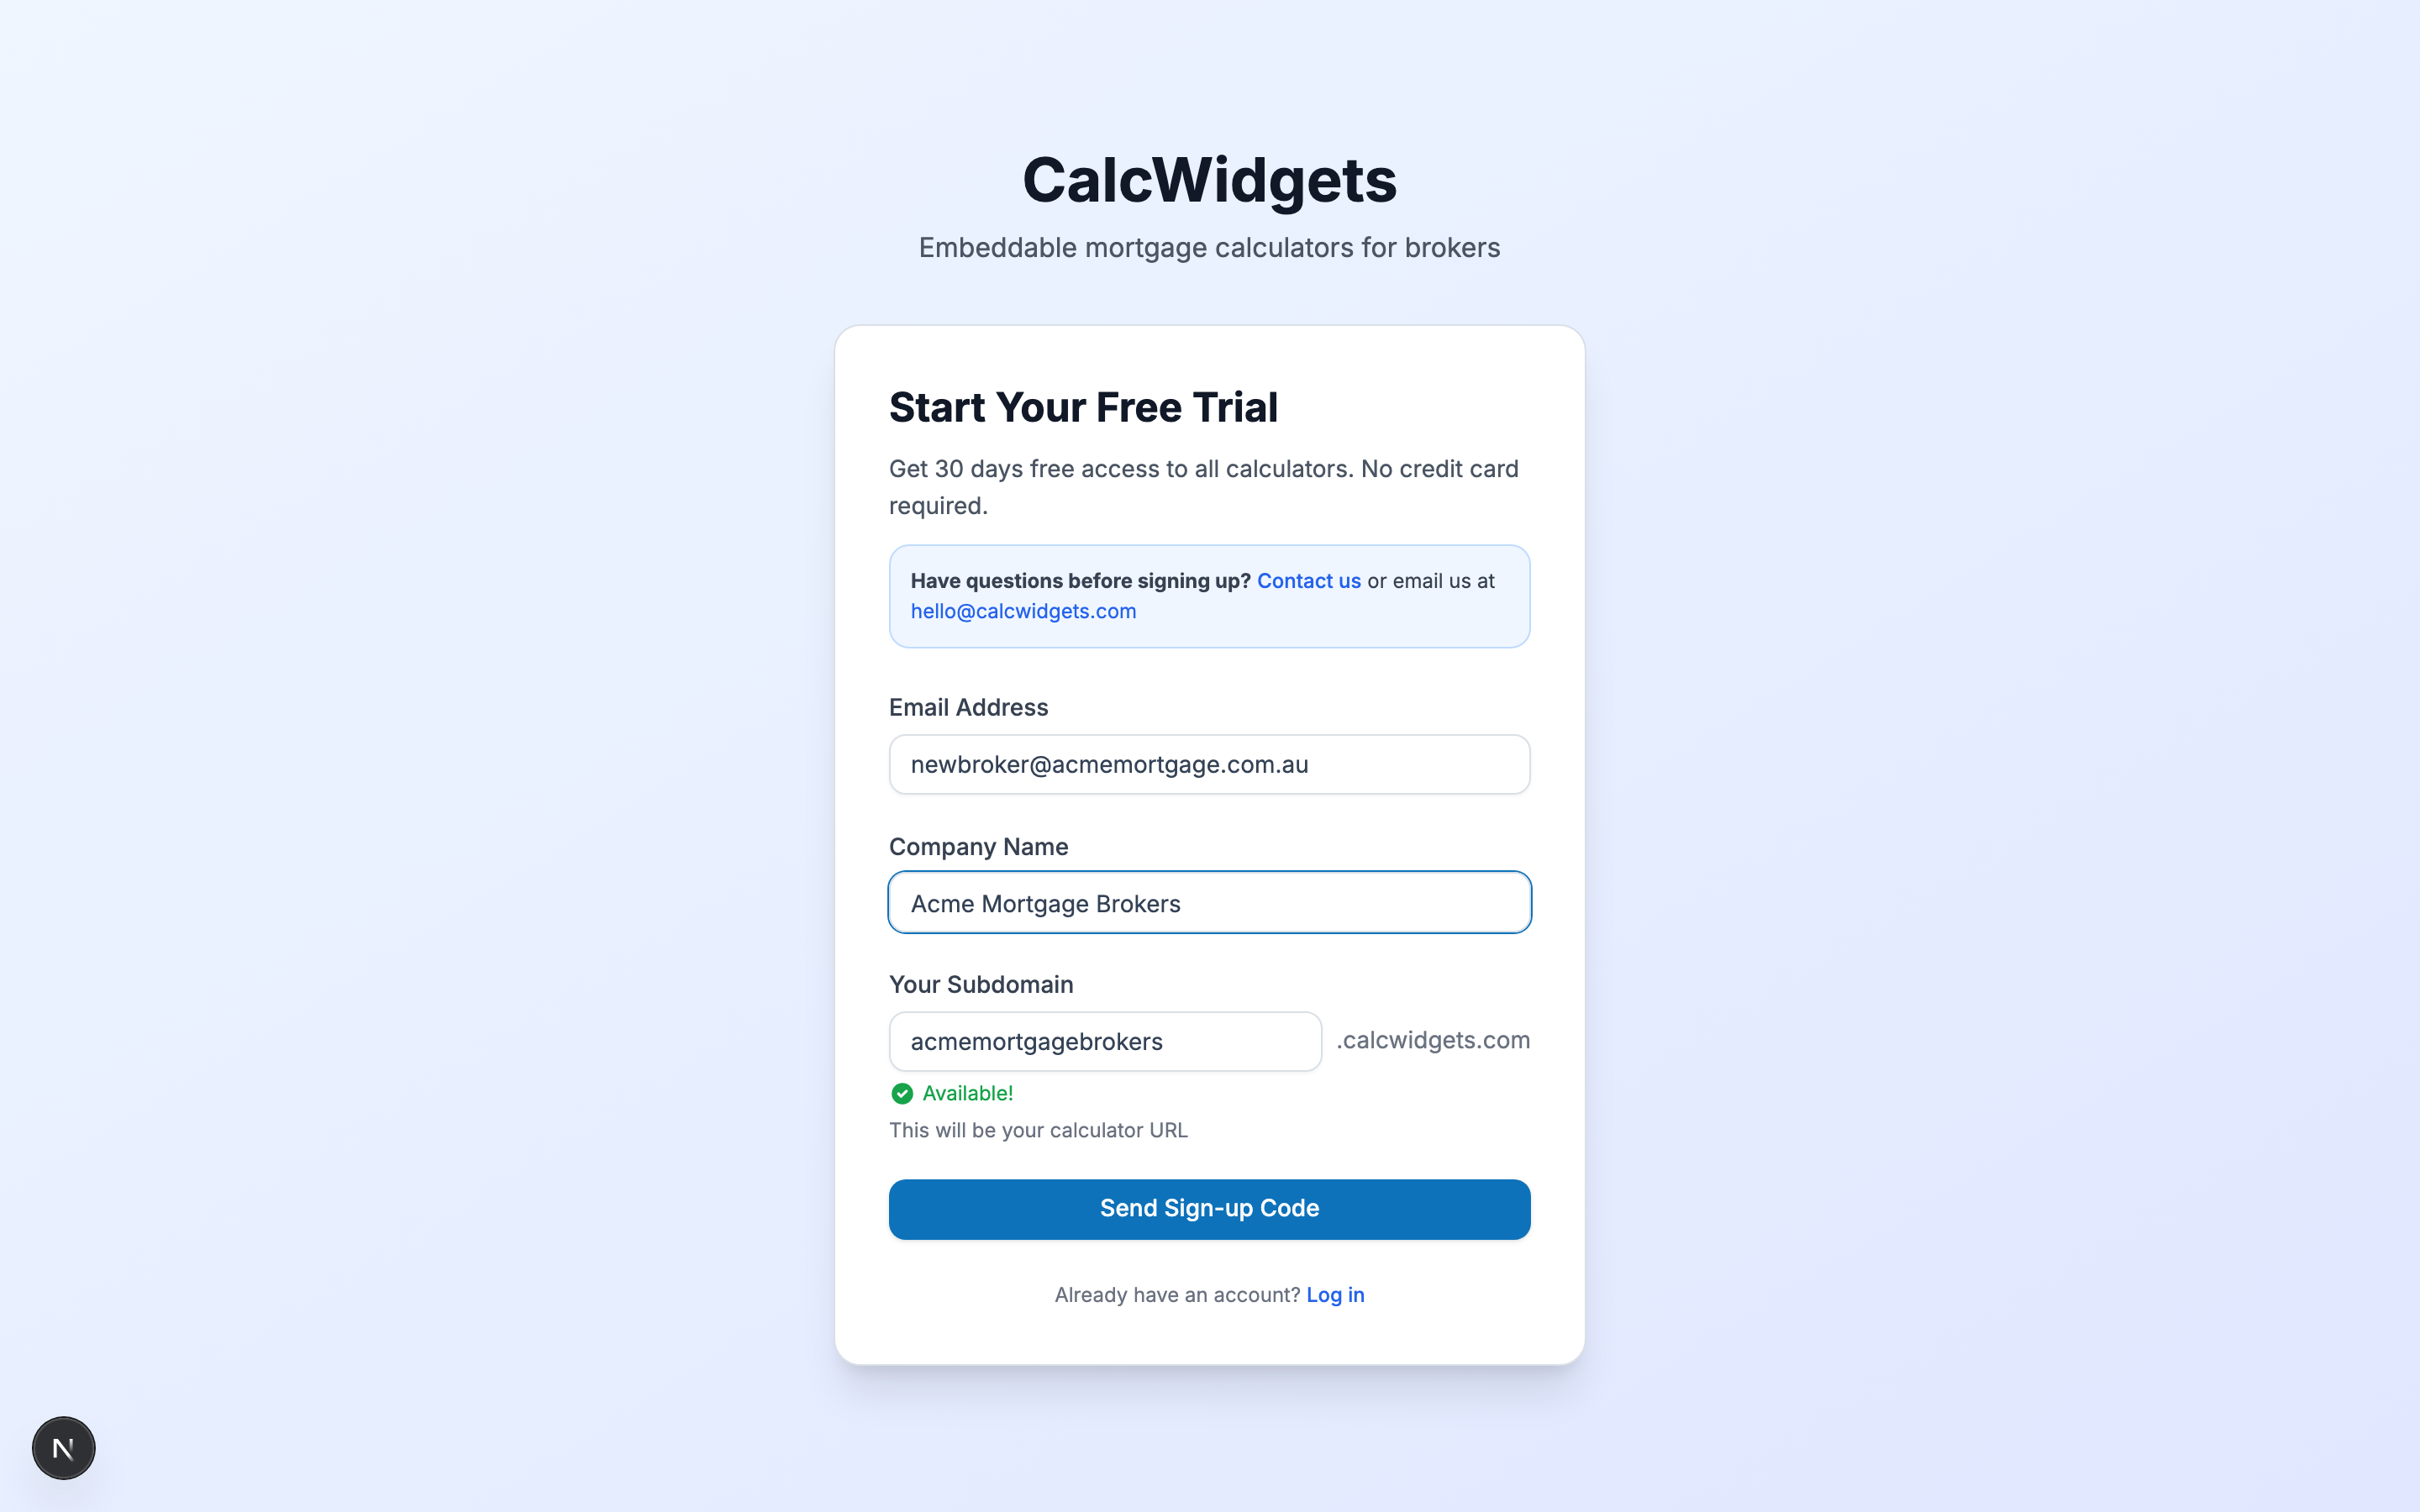
There are three fields:
-
Email address — where the verification code arrives, and where invoices and account emails will land. Use your real business email; you can change it later from Dashboard → Settings.
-
Company name — this is what shows up on your dashboard and on the welcome screen. "ABC Mortgage Brokers", "Smith & Co Finance", whatever you go to market as.
-
Your subdomain — auto-generated from the company name (we strip spaces and punctuation, lowercase everything, and cap at 30 characters). You can override it. Whatever you choose becomes the host for your embed URL:
https://yoursubdomain.calcwidgets.com/embed?....
The subdomain field checks availability in real time — green tick when it's free, red cross when it's taken. The Send Sign-up Code button stays disabled until you pick something available.
Pick the subdomain you can live with
You can change it later by emailing support, but it isn't a self-serve change. So a few things to think about:
- Short and memorable beats clever.
johnbrokersis better thanjohnsfinancesolutions. - Match what your customers know you by. If your business is "Smith Mortgage Group" but everyone calls you "Smithy's", neither is wrong — just pick the one you'd recognise.
- No punctuation. The subdomain accepts
a-zand0-9only. Hyphens are not allowed. - It does not have to match your website domain.
yourbrokerage.calcwidgets.comis fine even if your website isyourbrokerage.com.au.
Hit Send Sign-up Code. You will get a 6-digit code in your inbox within seconds (check spam if it doesn't arrive in a minute — and if it lands in spam, mark it "not spam" so future emails come through).
Enter the code
The next screen asks for the 6-digit code. Paste or type it into the boxes — verification fires automatically the moment all six are entered. No need to click a submit button.
If the code expires (after 10 minutes) or arrives garbled, click Resend code. If you typed the email wrong, click ← Edit details to go back.
Once the code verifies, you land on the onboarding wizard.
Part 2 — The four-step onboarding wizard
The wizard is intentionally short — four steps, takes a minute or two — because we want you in the dashboard, not stuck filling forms. Everything you set here is editable later from Dashboard → Branding, so don't agonise over the choices.
Step 1: Region
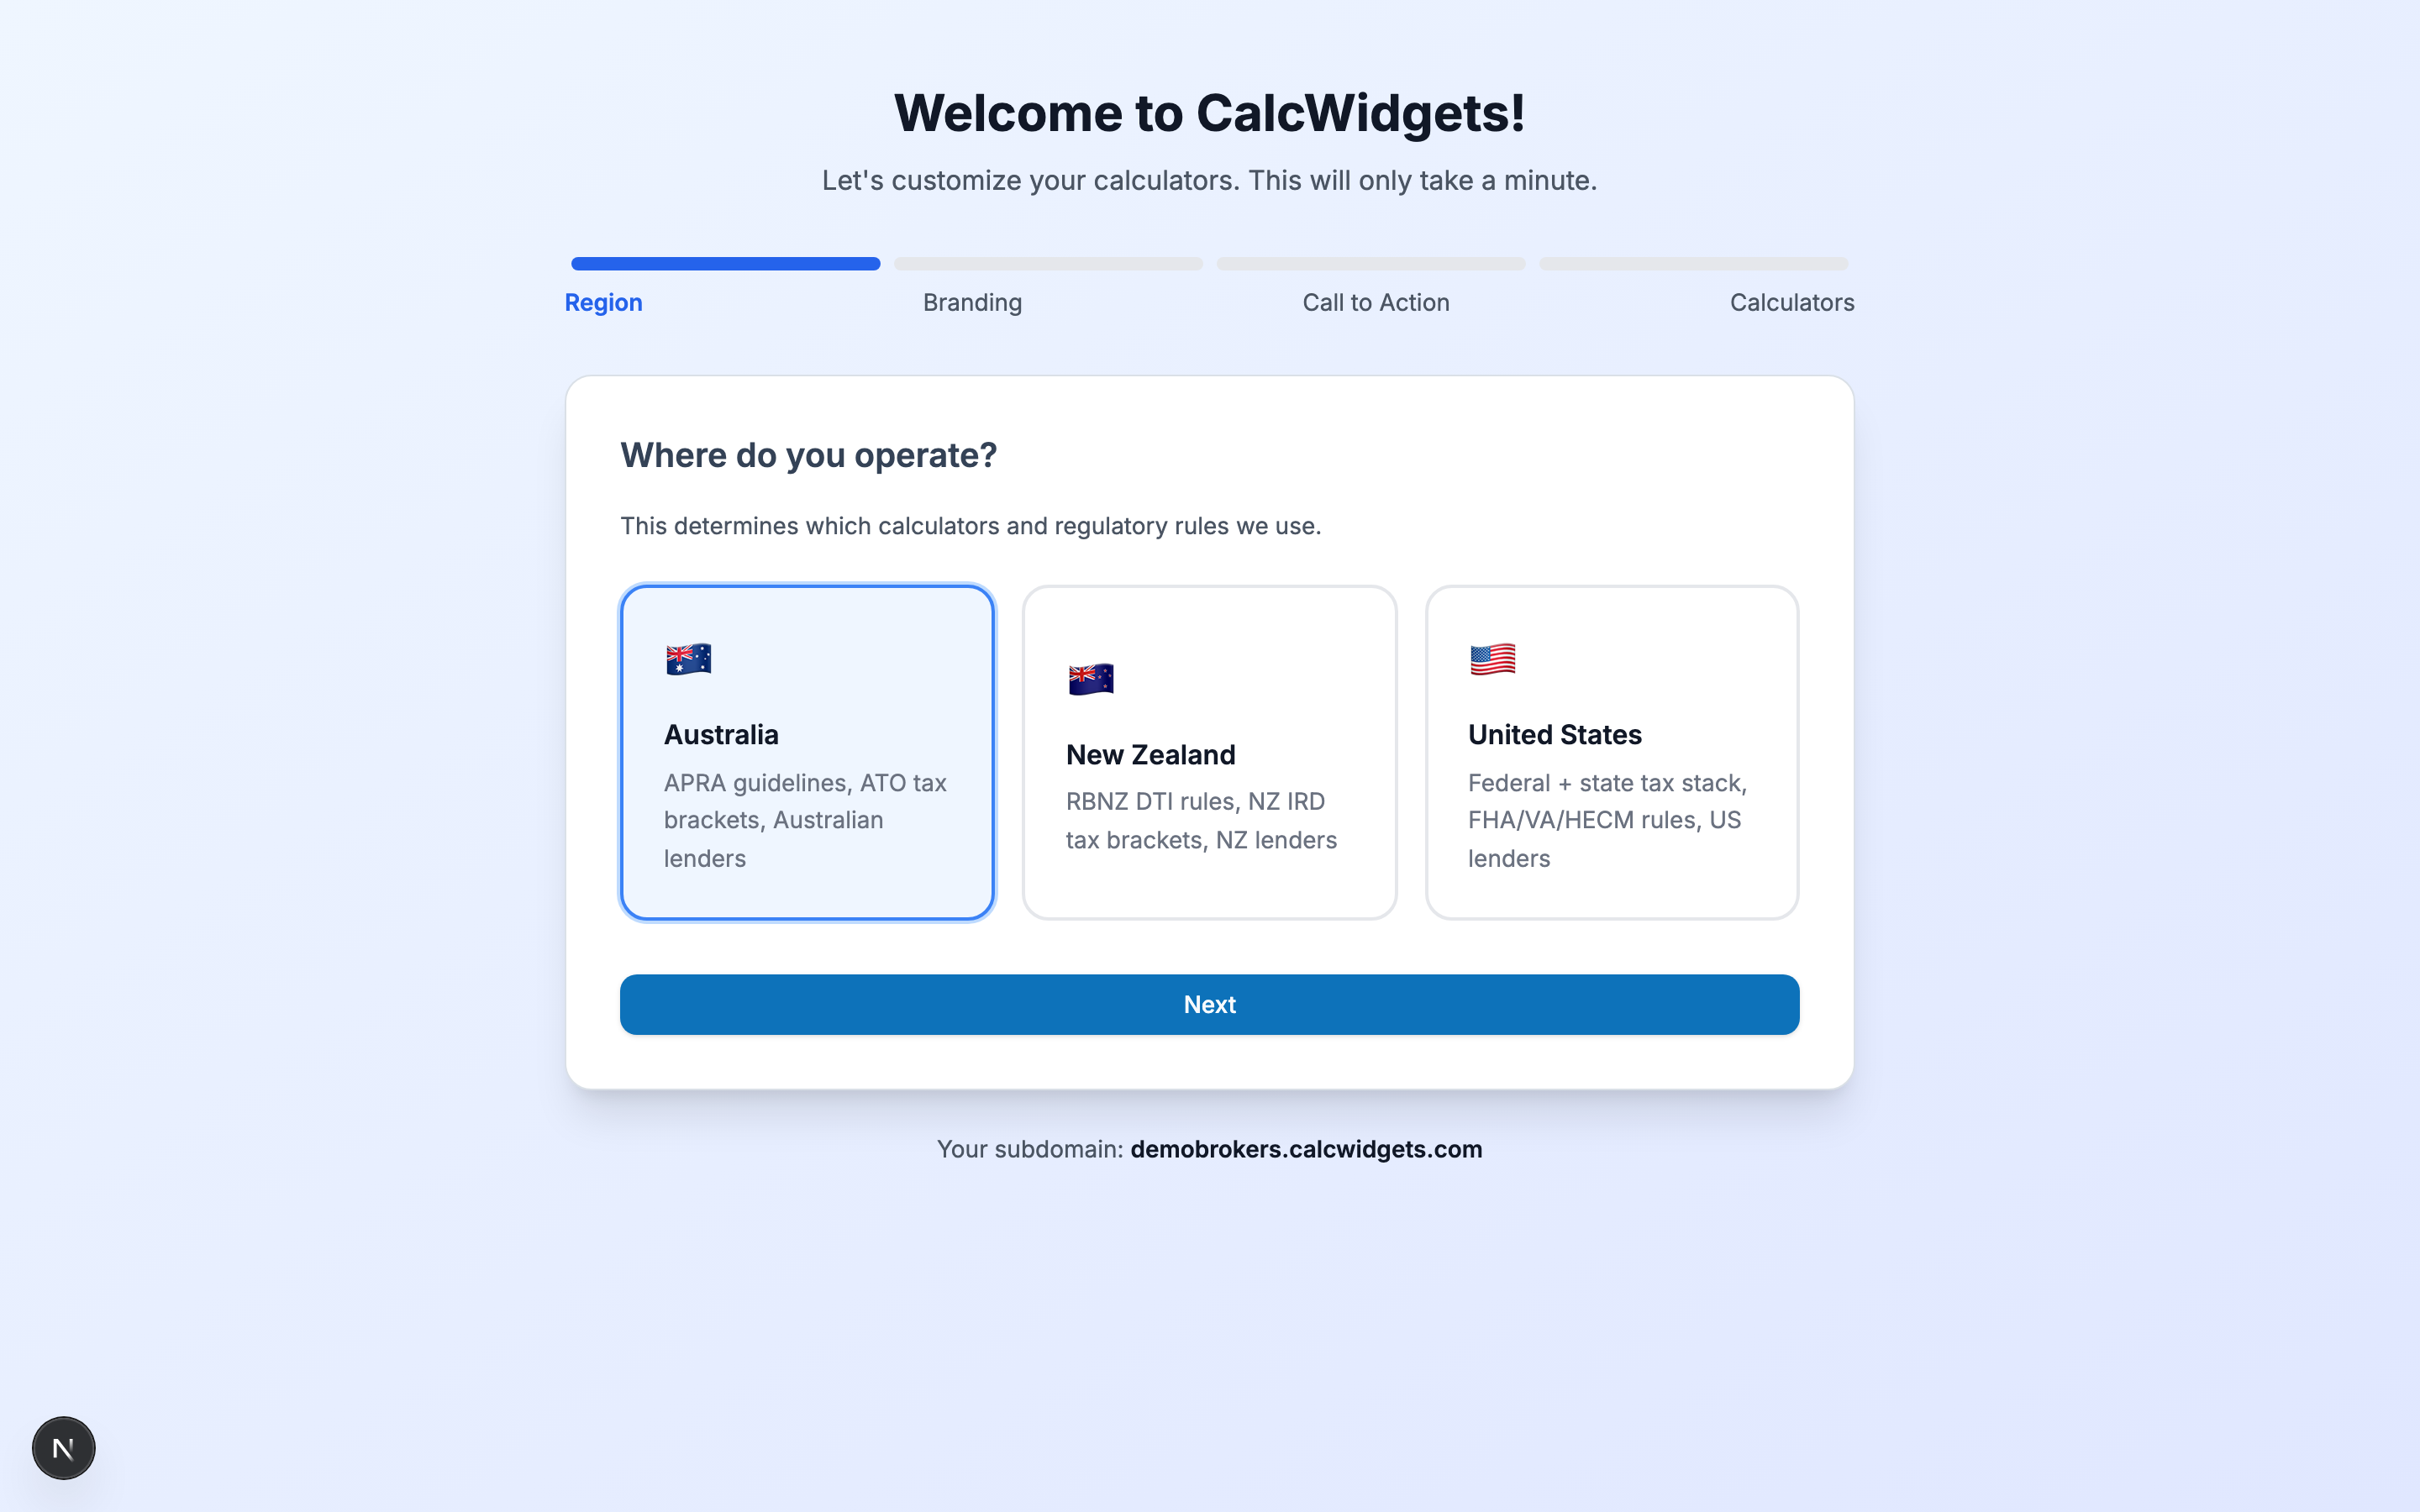
Pick the country you operate in:
| Region | What's tailored | Examples |
|---|---|---|
| Australia | APRA serviceability rules, ATO tax brackets, AU state stamp duty | LMI, LVR, FHB concessions per state, negative gearing |
| New Zealand | RBNZ DTI caps, NZ IRD income tax, NZ-specific calculators | KiwiSaver first-home, Bright-line test, NZ borrowing capacity with 6×/7× DTI |
| United States | Federal + state tax stack, US lender products | FHA, VA, HECM (reverse mortgage), HELOC |
This choice filters which calculators you can pick from in step 4 — a NZ broker doesn't need to see AU stamp duty, and an AU broker shouldn't have to wade past HECM. It also drives which regulatory rules the calculators run under (an AU borrowing-capacity result is APRA-style; an NZ one is RBNZ DTI-aware).
You can only operate in one region per account. If you serve multiple markets (rare, but it happens), you'd want a second account — drop us a line at hello@calcwidgets.com and we'll sort it.
Click Next.
Step 2: Brand colours and logo
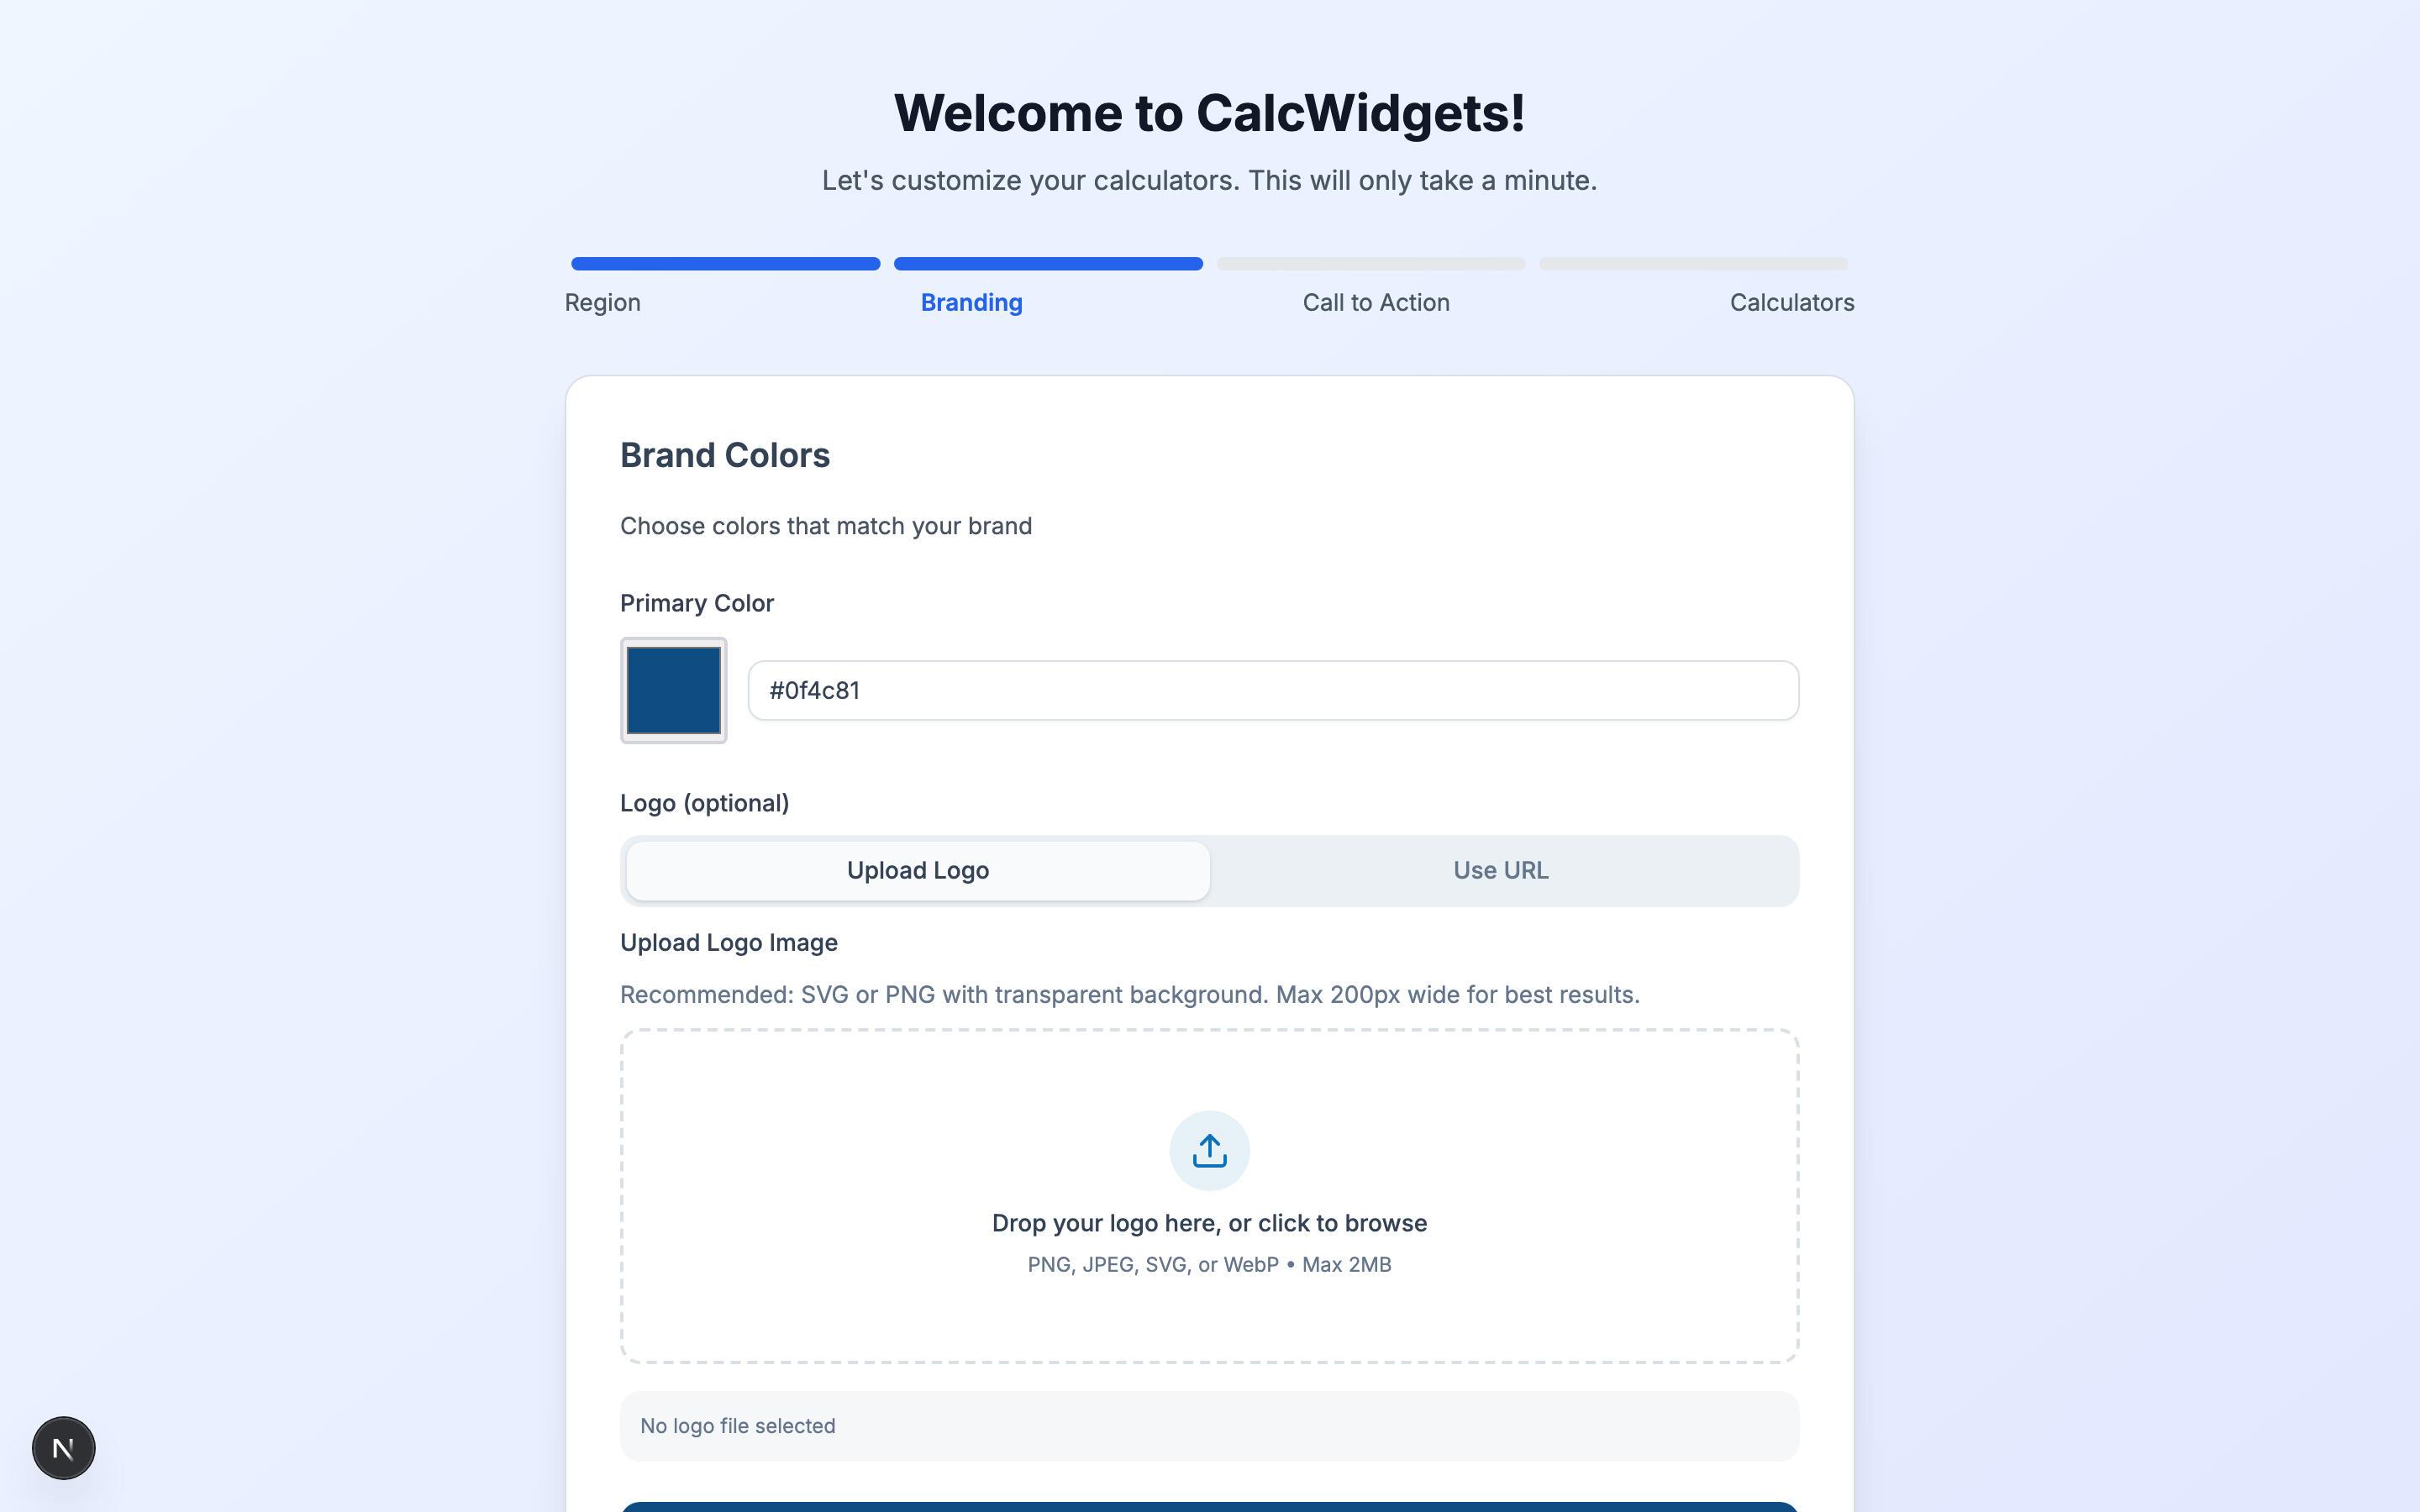
This is where the white-label happens.
Primary colour. Click the colour swatch on the left to open the OS colour picker, or type a hex value directly into the field (e.g. #0F4C81). The live preview bar at the bottom updates as you change it. This colour becomes the primary accent throughout your calculators — buttons, focus rings, chart highlights, your CTA button.
A few hex codes to start from if you don't have brand guidelines handy:
Trustworthy navy:  #0F4C81
Forest green:      #2E7D32
Burnt orange:      #D84315
Charcoal:          #1F2937
Royal purple:      #4338CA
Logo. Two ways to provide it:
- Upload a PNG or SVG (max ~2 MB). The file is stored in your private bucket and served from our CDN. Use a transparent-background PNG for the cleanest look.
- Paste a URL if your logo already lives on your website's CDN (e.g.
https://yourbrokerage.com.au/wp-content/uploads/logo.png).
The logo shows up on the calculator's header bar and on share/result screens. It also appears in the floating widget's open button if you use that layout.
If you skip the logo for now, the calculator header just shows your company name as text. You can come back and add it any time.
You don't pick secondary or accent colours at this step — they default to sensible values (deeper navy and an orange highlight) and you can fine-tune them later from Dashboard → Branding.
Click Next.
Step 3: Call to action
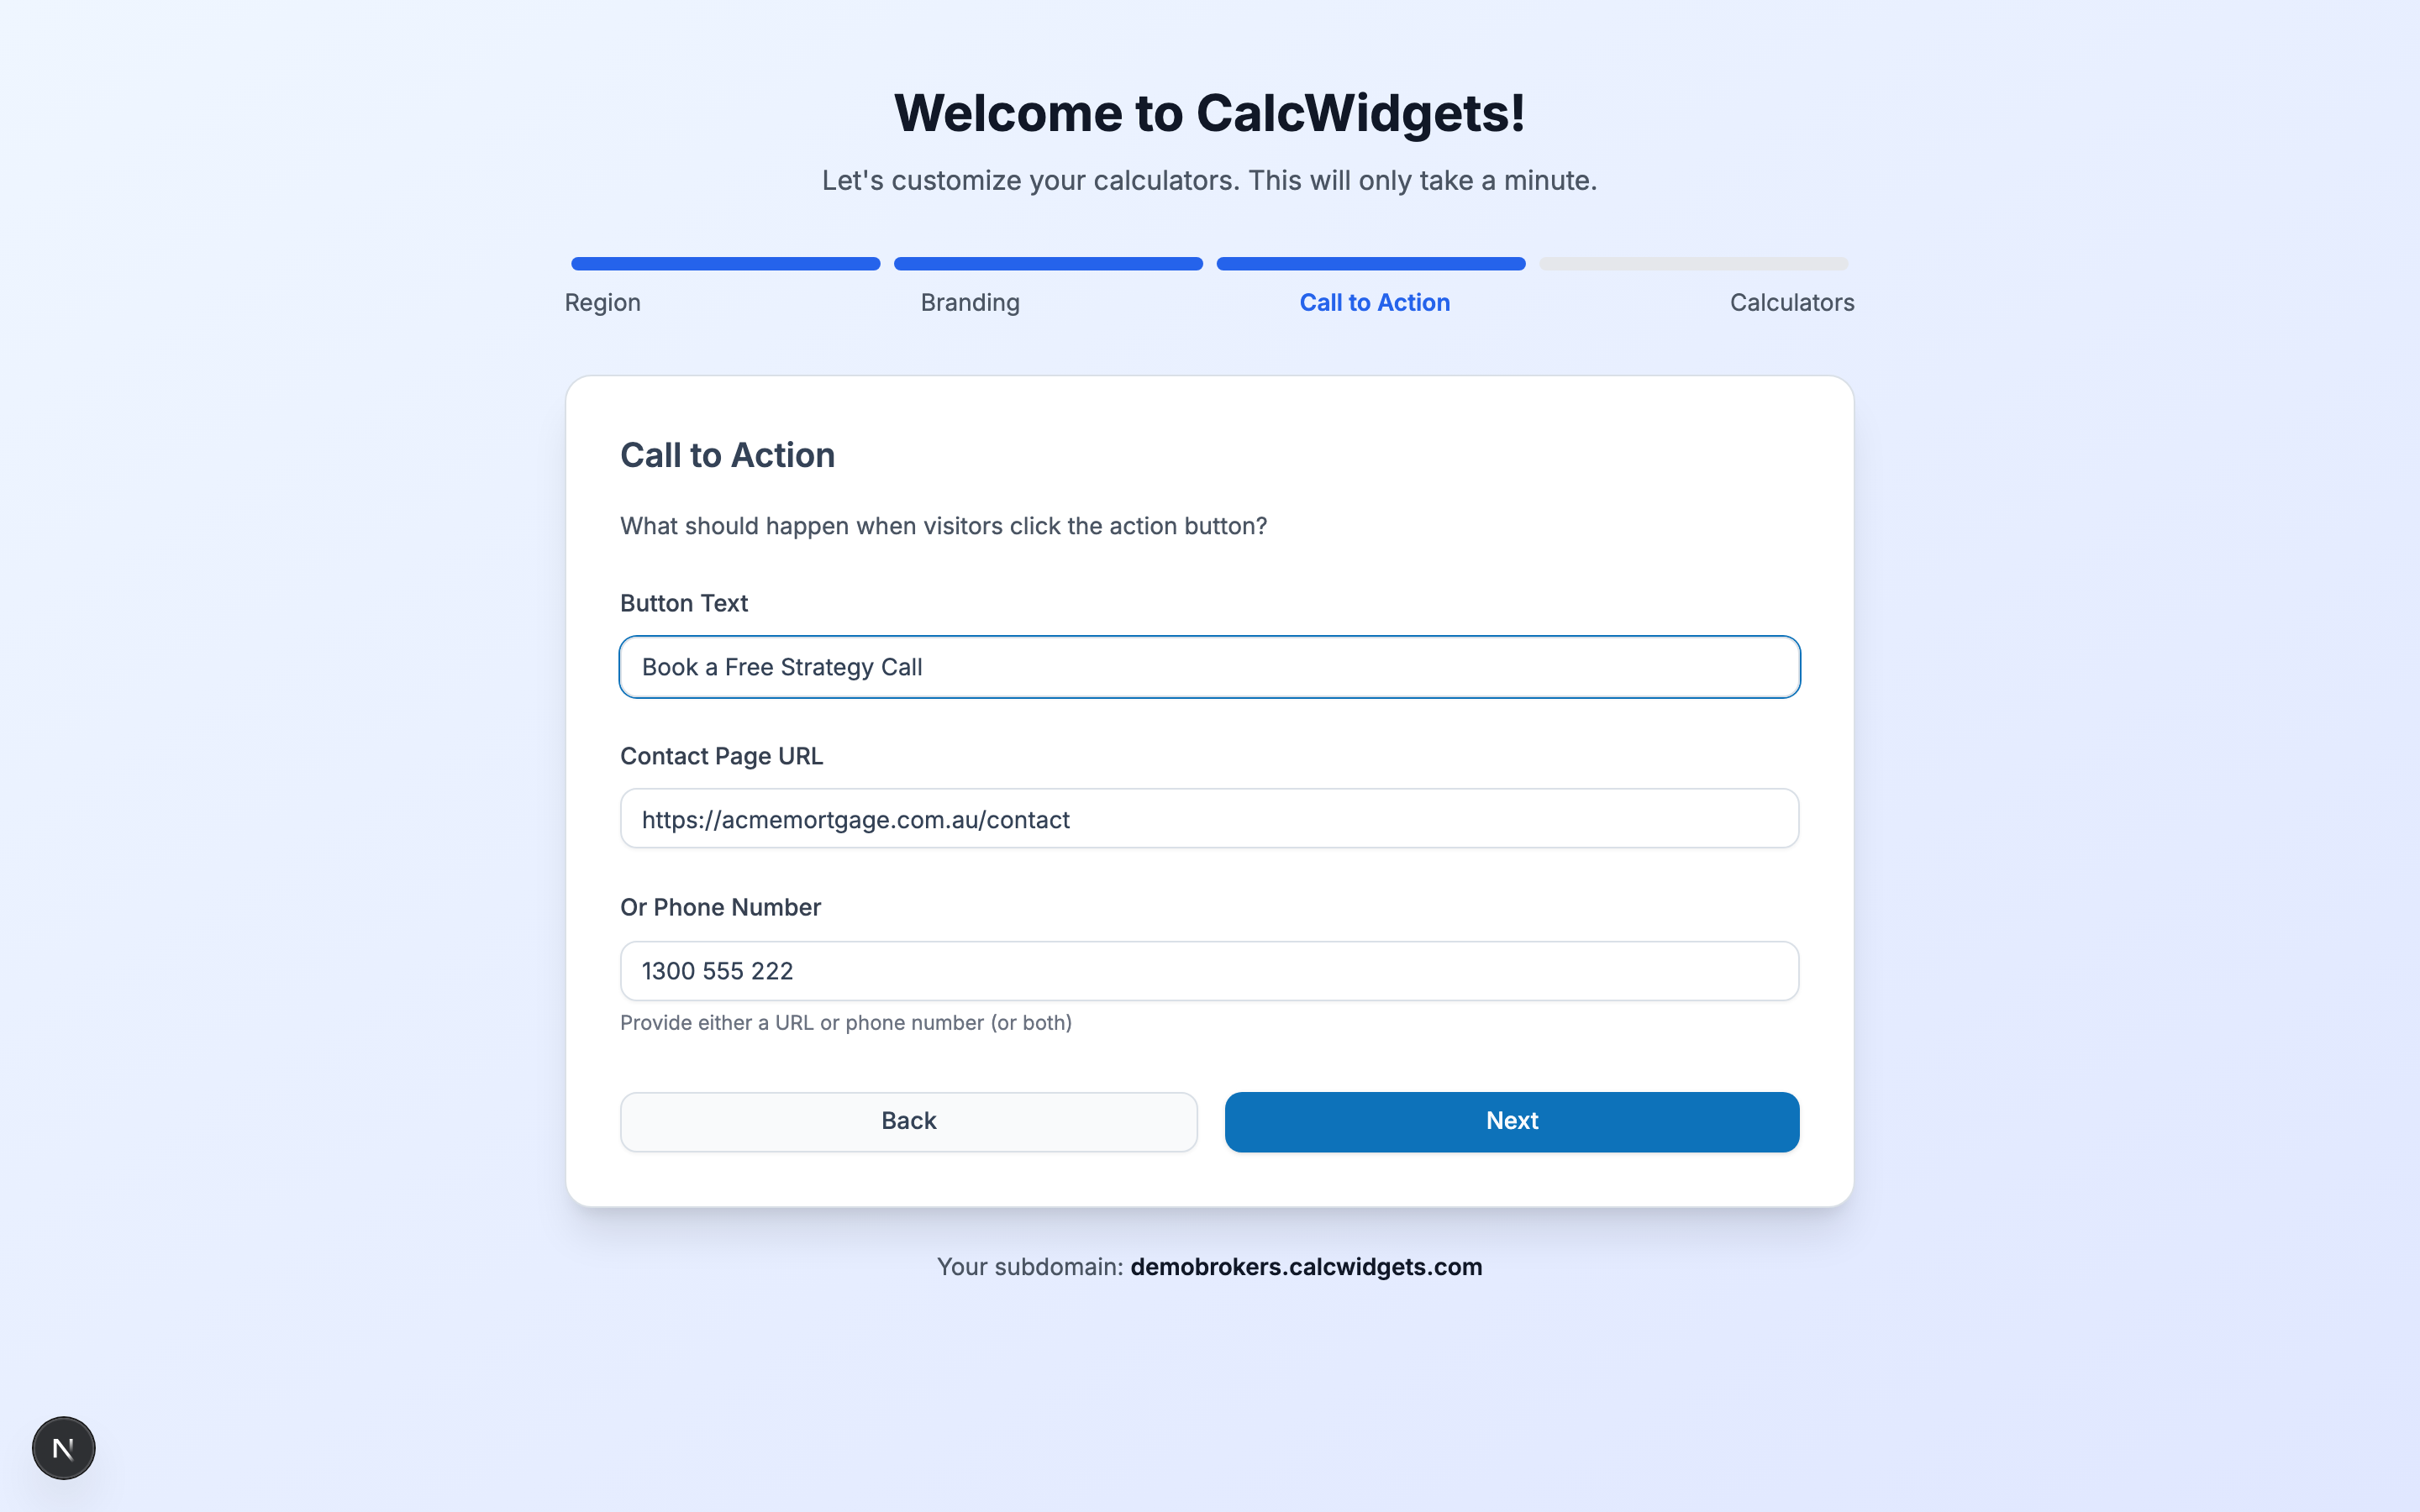
Every CalcWidgets calculator ends with a CTA button. This is the conversion moment — the visitor has just seen how much they can borrow, or how much stamp duty they owe, and they're in the right frame of mind to talk to a human.
You configure three things:
-
Button text — the words on the button. Defaults to "Get in Touch". Better ones we've seen from real brokers: "Book a Free Strategy Call", "Talk to a Broker", "See if You Qualify", "Get My Pre-Approval". Match the language to the calculator context — a refinance result button might say "Find Out How Much You Could Save".
-
Contact URL — where the click goes. Usually your contact page (
https://yourbrokerage.com.au/contact), but could be a Calendly link, a Typeform, a HubSpot meeting URL — anything that turns the visitor into a conversation. -
Phone number — optional. If you fill this in, the button on mobile becomes a
tel:link that opens the dialler. On desktop it stays as the URL (or the phone, depending on your preference — you can fine-tune this from the branding editor later).
You should provide at least one of URL or phone. If both are blank, the calculator still works but the CTA button at the end becomes a dead end.
Click Next.
Step 4: Calculators and layout
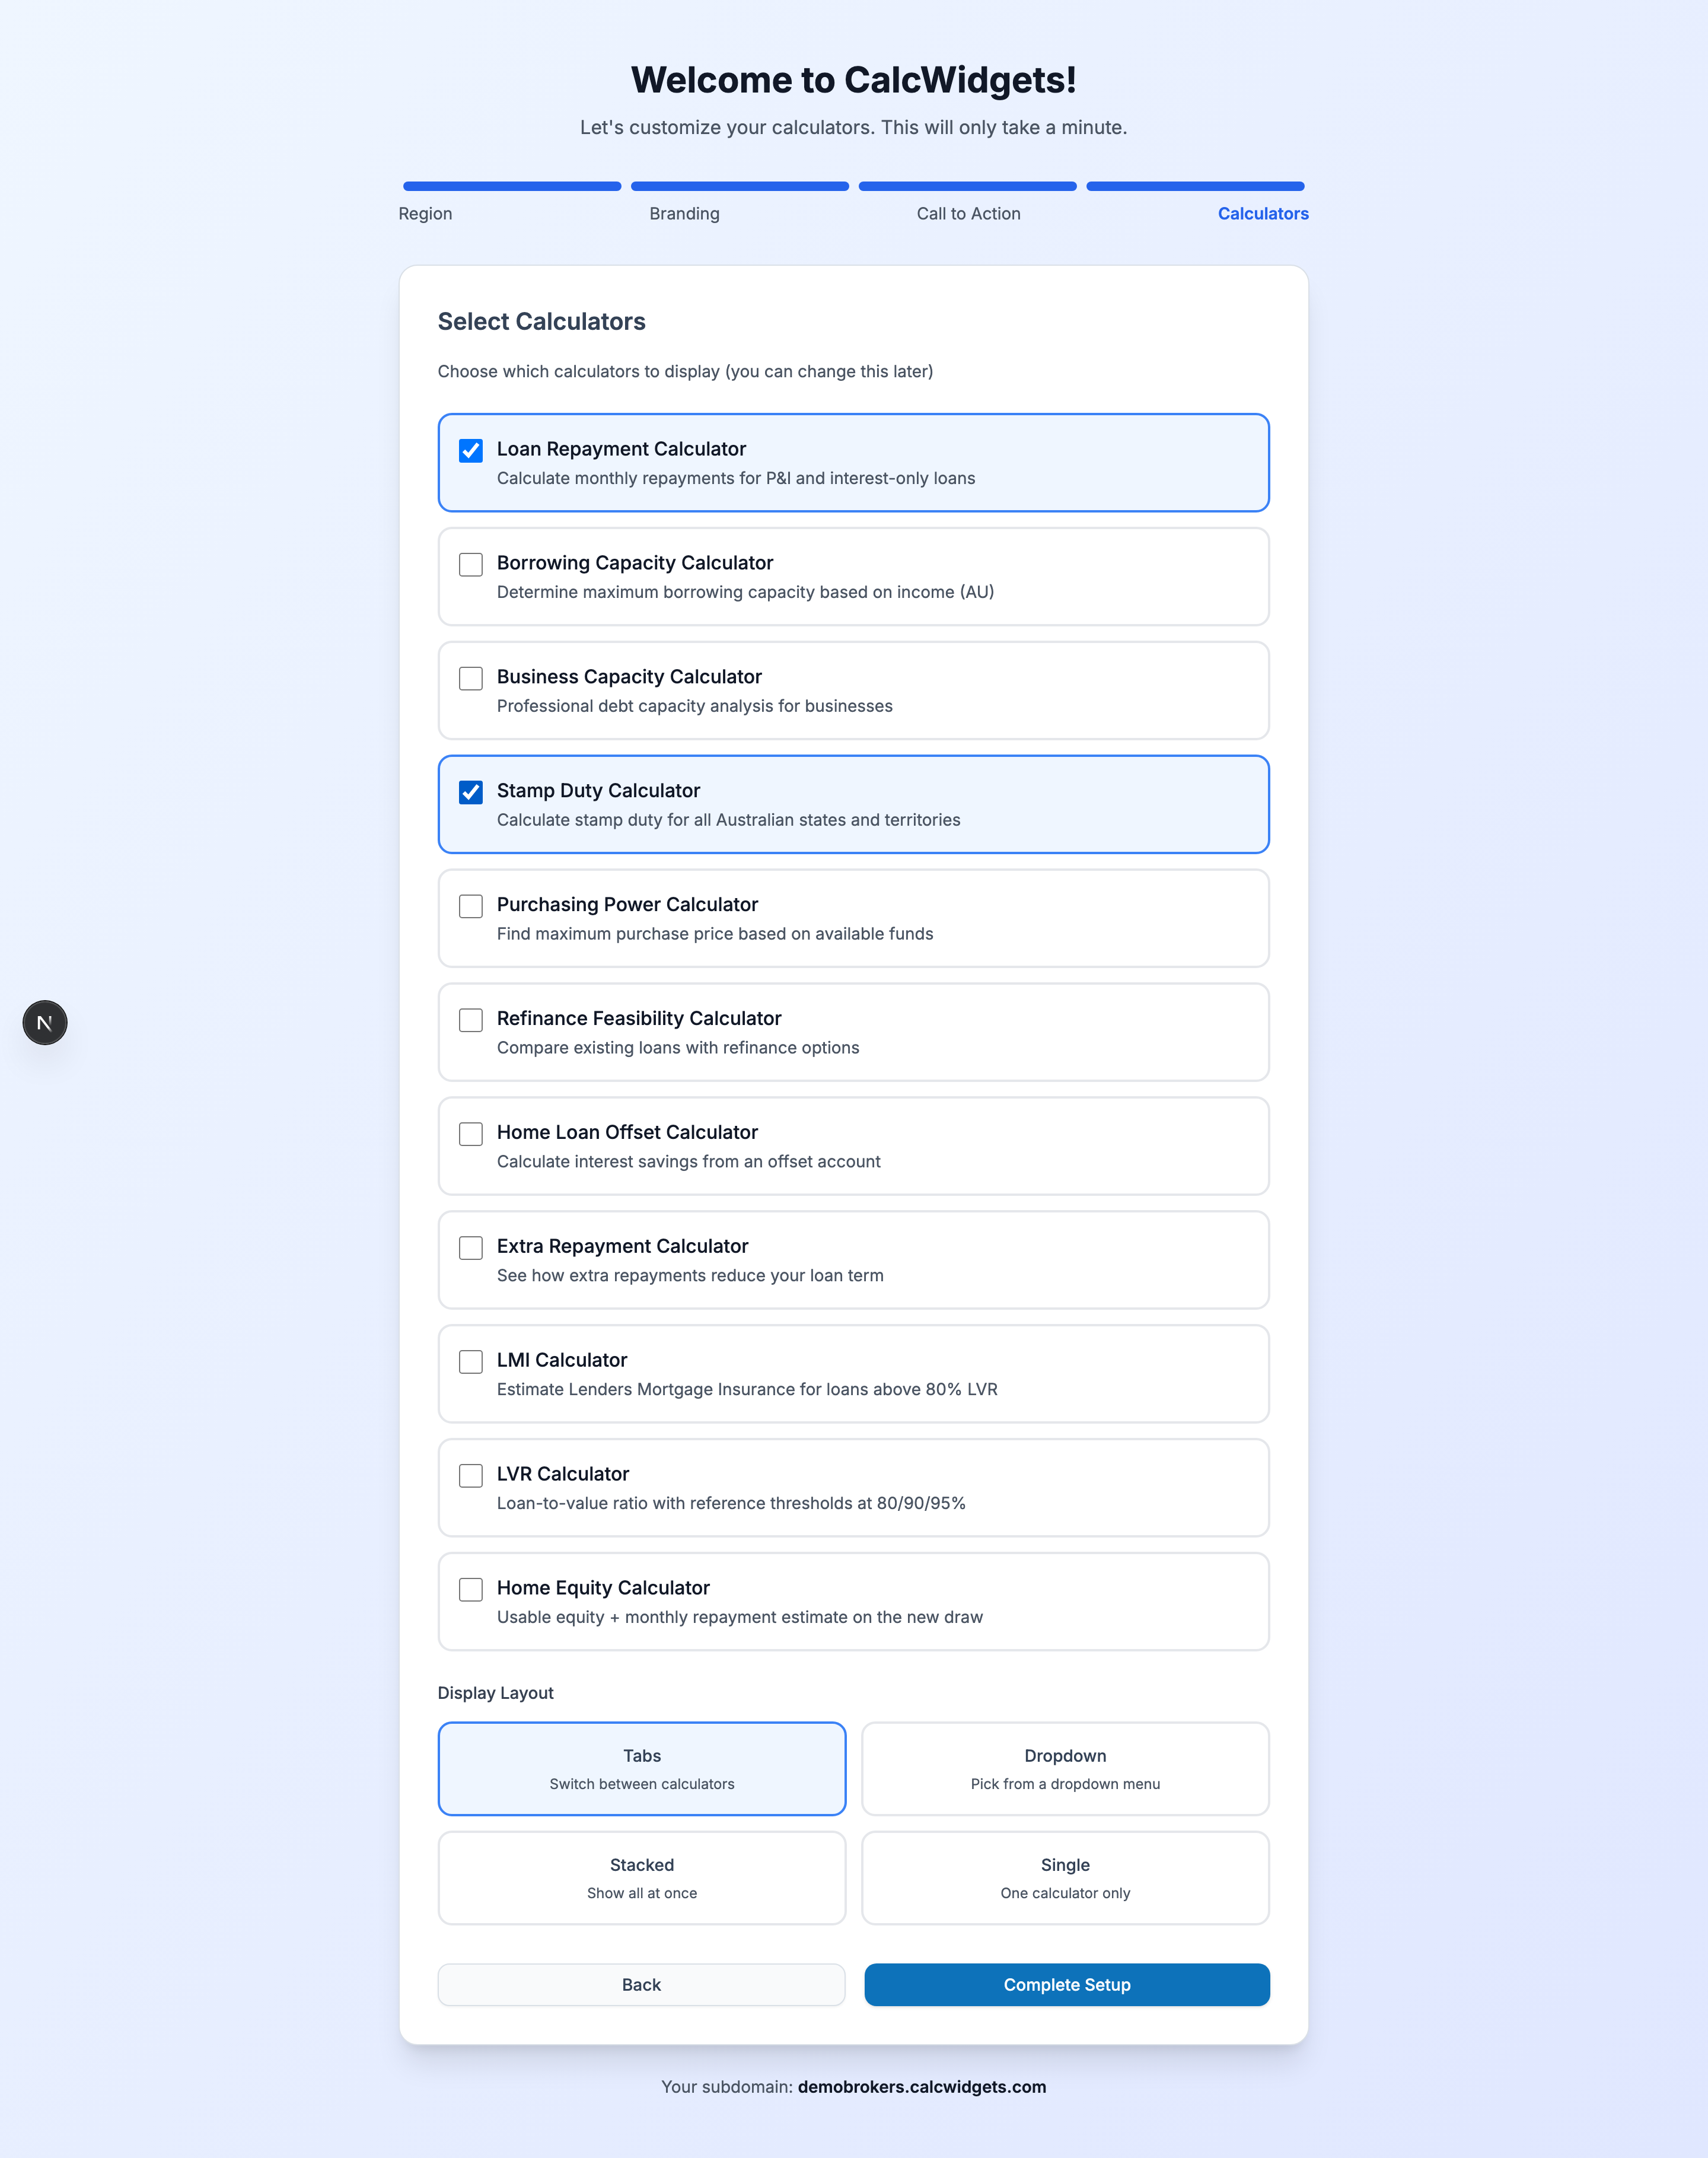
The longest step, but only because the list is dense.
Select calculators. Tick the ones you want to expose. You must pick at least one. A starter set most brokers go with:
- Loan Repayment Calculator — the bread and butter; everyone clicks this
- Borrowing Capacity Calculator — your top-of-funnel qualifier; tells visitors what they can afford
- Stamp Duty Calculator — high-intent FHB traffic
- Refinance Feasibility Calculator — if you do any refi business at all
- LMI Calculator — if you work with sub-20%-deposit borrowers
- Offset Calculator — closes deals because it shows the impact of an offset facility most people don't understand
You don't need to enable everything on day one. The wizard shows the core 12 — the full catalogue is larger (33+ calculators across AU/NZ) and you can enable the rest from Dashboard → Calculators after onboarding.
Display Layout. This controls how your visitors navigate between calculators when you embed more than one:
| Layout | When to use it |
|---|---|
| Tabs (default) | 2–6 calculators; horizontal tab strip across the top. Best UX for most brokers. |
| Dropdown | 7+ calculators; one dropdown with all options. Saves vertical space. |
| Stacked | All calculators visible at once, one below the other. Best when you want SEO on every calculator's content. |
| Single | Show only one calculator. Best for landing pages where the page is about that one calculator. |
You can override the layout per embed later — this is just the default. If you only pick one calculator, the layout is ignored automatically and it renders as a single full-width widget.
Click Complete Setup. The wizard provisions your client record, fires the welcome email, and drops you on the dashboard.
Part 3 — Your dashboard
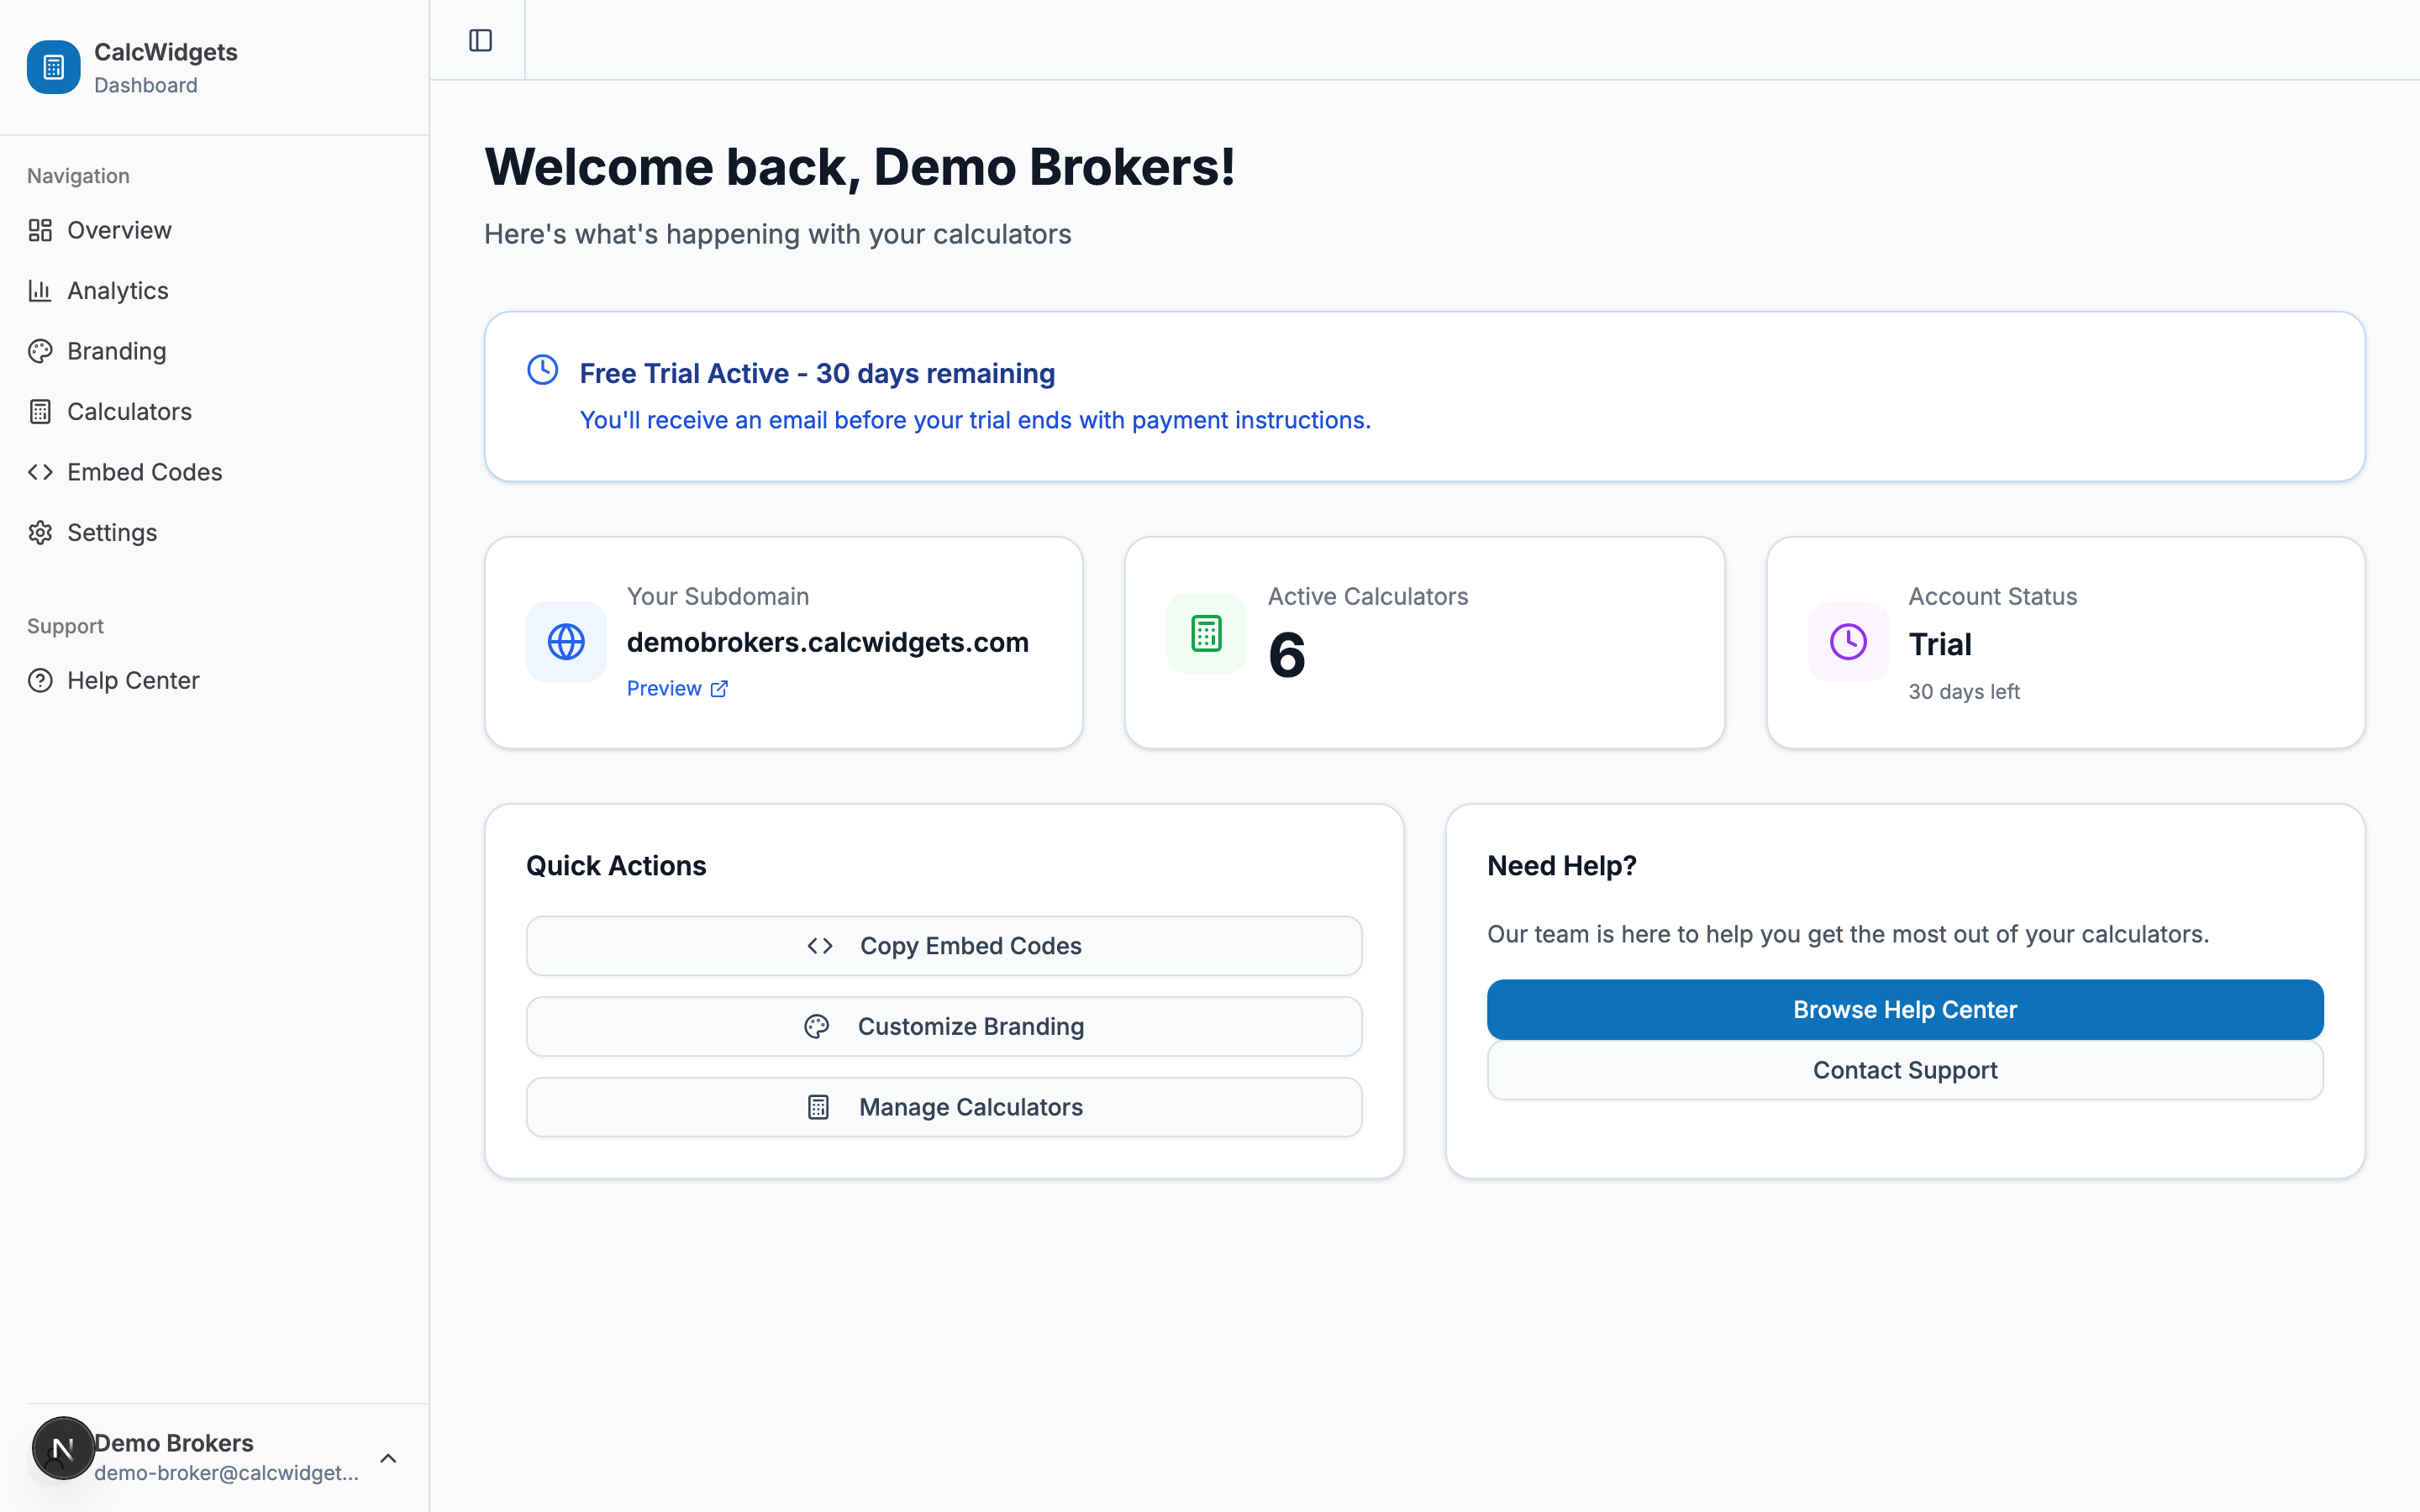
The dashboard is the hub. The left sidebar takes you everywhere; the home view shows you the state of your account at a glance.
What you see on the home page:
- Trial status banner. New accounts get a 14-day free trial — no card required. The banner shows days remaining and warns when you're a week out.
- Your subdomain card. One click opens your live preview so you can see what visitors see. Bookmark this URL.
- Active calculator count. Updates whenever you toggle calculators on or off.
- Account status. "Trial" while you're in the free period, "Active" once you subscribe, "Suspended" if a payment fails.
- Quick actions. Three shortcut buttons — Copy Embed Codes, Customise Branding, Manage Calculators — for the three things you'll come back to most often.
- Need Help? Direct link to the help centre and a Contact Support button that opens an email draft to our team.
The sidebar gives you the full map:
- Overview — this page
- Analytics — how many times each calculator was used, which calculators convert best, what pages they were embedded on
- Branding — colours, logo, fonts, CTA
- Calculators — toggle individual calculators on/off, override defaults, configure region-specific settings (DTI for NZ, FHB rules for AU)
- Embed Codes — the page you'll spend the most time on once you're set up
- Settings — account email, company name, subscription, password
Take a minute to click around. You won't break anything.
Part 4 — Customising your brand properly
The wizard set sensible defaults. Dashboard → Branding is where you make it actually look like your business.

The screen is split: form fields on the left, a live preview iframe on the right. Every change shows up in the preview without a page reload.
Colours
You get three colours to play with:
- Primary — the dominant brand colour. Buttons, focus states, the CTA, chart highlights, active tab indicators. About 70% of the colour you'll see in the calculator.
- Secondary — a complementary colour for secondary buttons, subtle backgrounds, and chart series. Usually a deeper or lighter shade of your primary.
- Accent — for emphasis where neither primary nor secondary fits. Used sparingly — typically on alert banners, "new" badges, and the savings figure in refinance results.
If you only have one brand colour, set primary to your brand colour, secondary to a 20%-darker shade, and accent to whatever pops against both. There's a hex picker on each so you can match exactly to your brand book.
Logo
Same options as the wizard — upload or URL. If you uploaded one during onboarding, you'll see it here with a small preview and a "Remove" option. If you change your mind about the logo, you can swap it freely — old uploads are deleted from storage when replaced.
A few logo tips that save support tickets:
- Use a transparent PNG or SVG with a clear "logo only" version (not the version with a tagline below it).
- Keep the file under 2 MB.
- Test on dark backgrounds — if you only have a single-colour logo and your primary colour is dark, the logo may not be visible on the calculator's header bar. We'll add a logo background option later this year; for now, use a version with a contrasting outline.
Call to action
The same three fields as the wizard, plus a few extras:
- CTA link type — choose what kind of link the button is: web URL, phone (
tel:), or email (mailto:). The icon on the button changes to match. - Open in new tab — toggle. Default is on, which is the right call: visitors don't lose your calculator when they click.
Calculator defaults and default layout
These are what gets used by your embed when you don't pass widgets= and view= parameters explicitly. Useful if you want a single "drop-in" embed snippet that you can re-use across many pages and have it always show the same set.
Hit Save at the bottom and the preview iframe reloads with the new branding live.
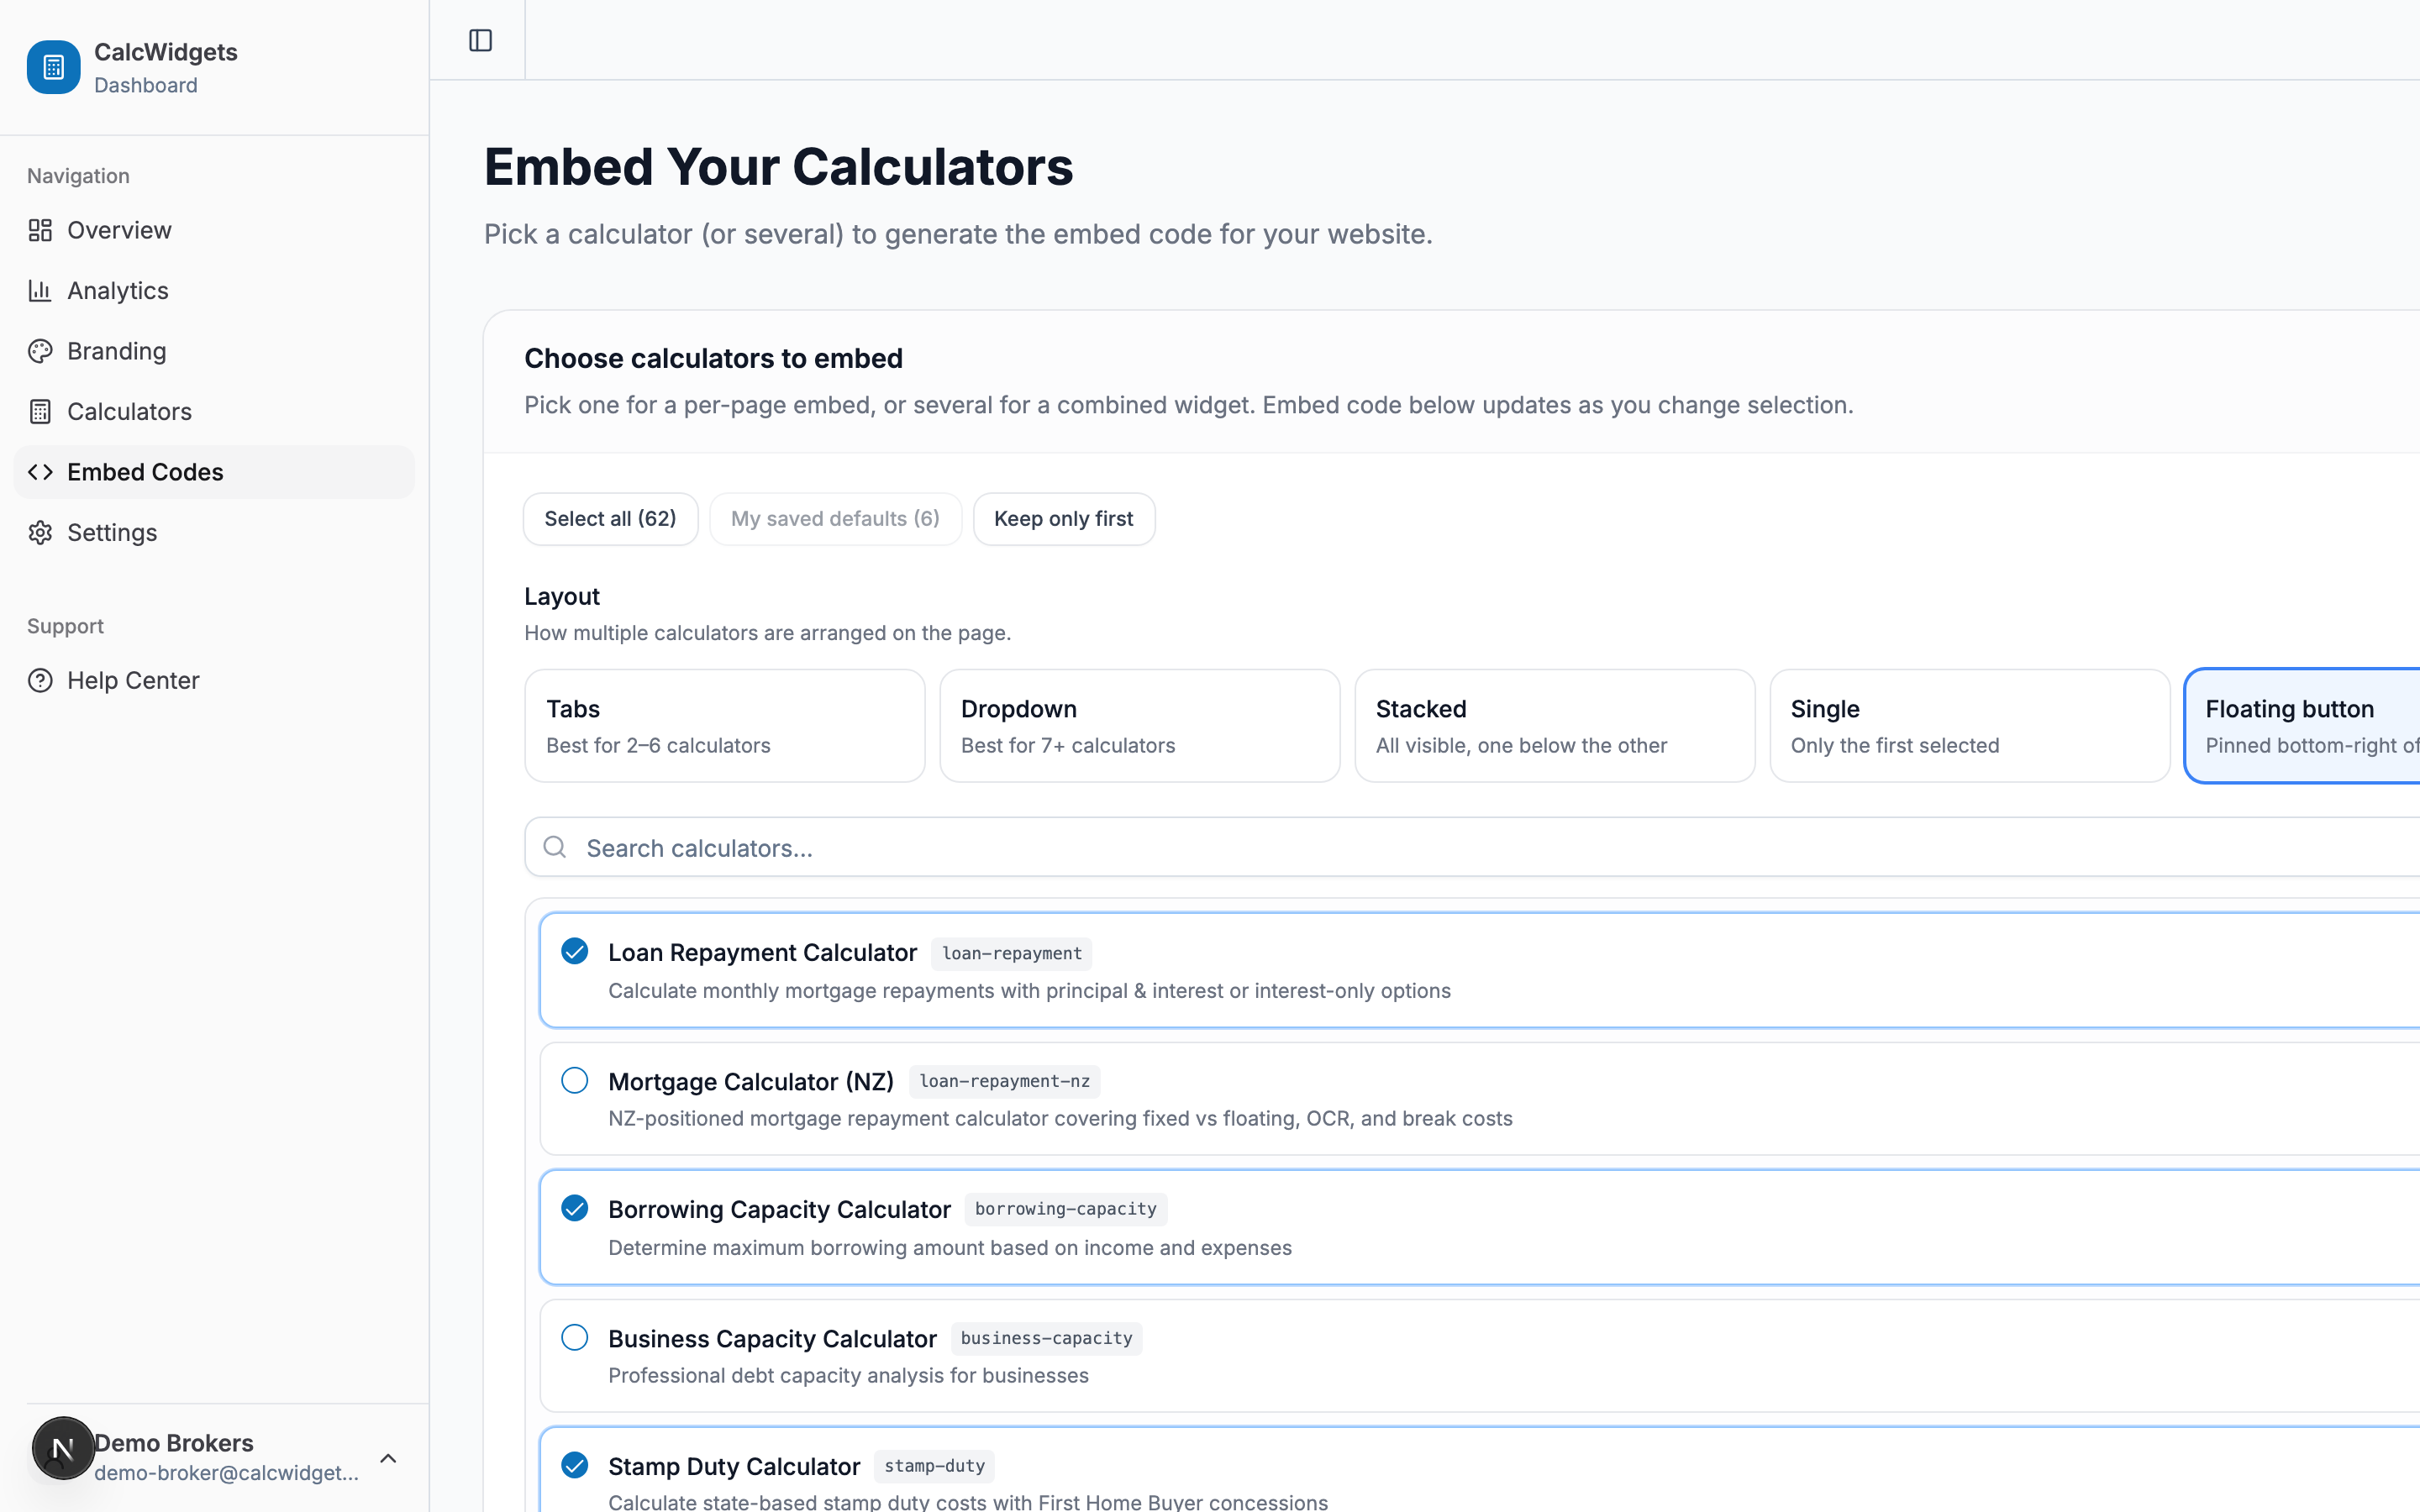
Part 5 — Generating your embed code
This is the screen you'll come back to every time you want to embed a calculator somewhere new.
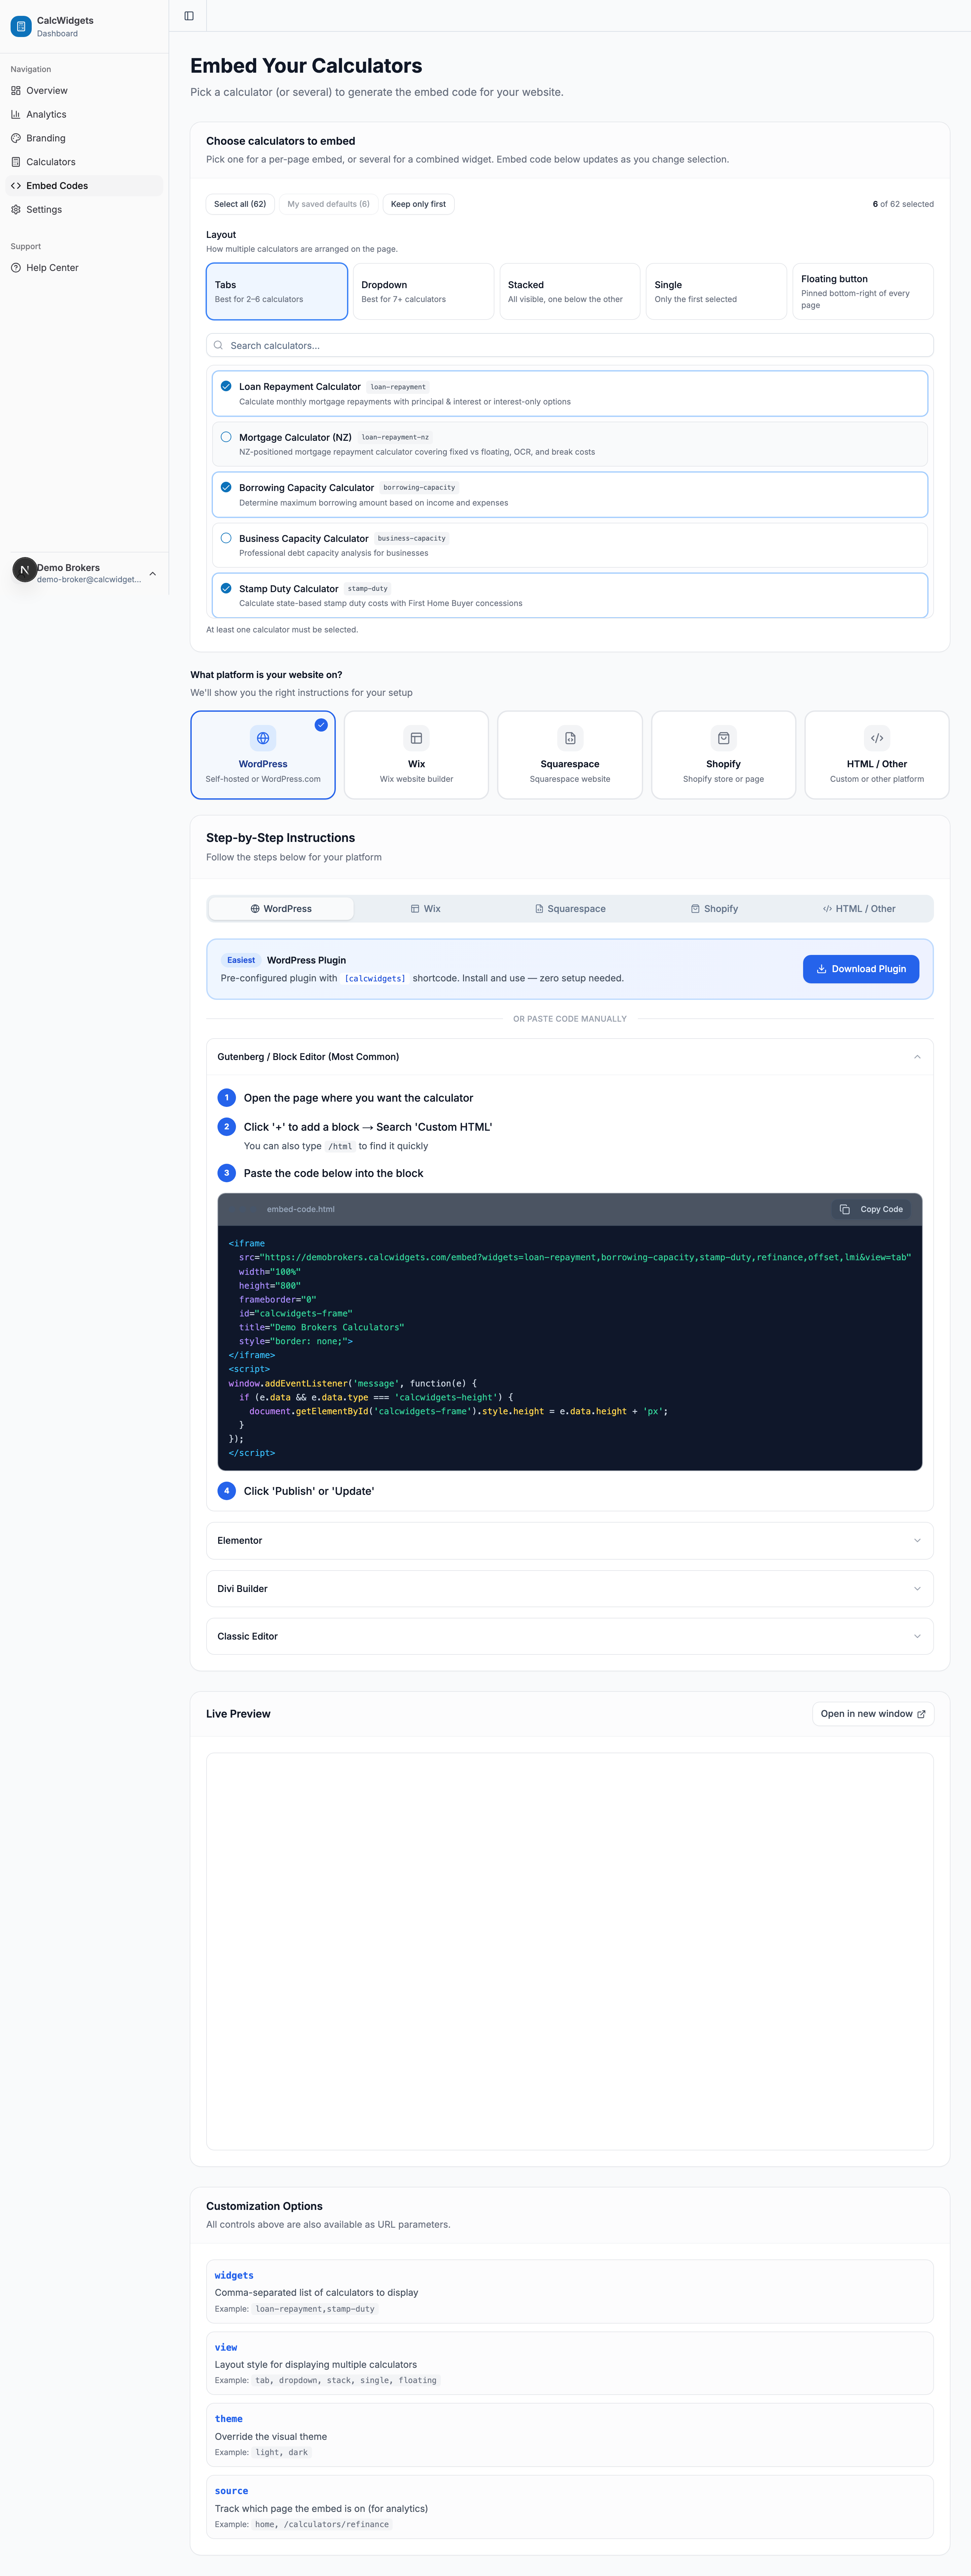
There are four interactive sections, top to bottom. Work through them in order.
5a. Choose calculators to embed
The top card lists every calculator available in your region with a checkbox. Tick the ones you want in this particular embed.
Three shortcut buttons up top:
- Select all — every calculator in your region (often 25+ for AU; 20+ for NZ)
- My saved defaults — the ones you ticked in onboarding (and configured under Branding)
- Keep only first — strips back to one calculator if you change your mind
A search box filters the list — type "stamp" to see just the stamp duty calculator, "refi" for refinance and refi-adjacent. Use this when you're looking at a long list and want to grab one specific tool.
The selection count ("3 of 12 selected") on the right keeps you oriented.
Important: At least one calculator must be selected. The picker won't let you uncheck the last one — it disables the checkbox.
5b. Pick a layout
The layout cards control how multiple calculators are arranged when the visitor sees the embed:
- Tabs — best for 2–6 calculators. Horizontal tab strip across the top, one calculator at a time below.
- Dropdown — best for 7+ calculators. One
<select>dropdown saves vertical space. - Stacked — every selected calculator visible, one below the other. The page gets long but every calculator's content is in the DOM (good for SEO).
- Single — only the first selected calculator is shown.
- Floating button — the special one. Pins a chat-bubble-style button to the bottom-right of every page. Click expands the calculator full-screen. See the floating widget guide for setup.
When you change layout, the embed code below updates in real time.
If you have only one calculator selected, the layout choice is ignored — there's nothing to switch between.
5c. Pick your platform
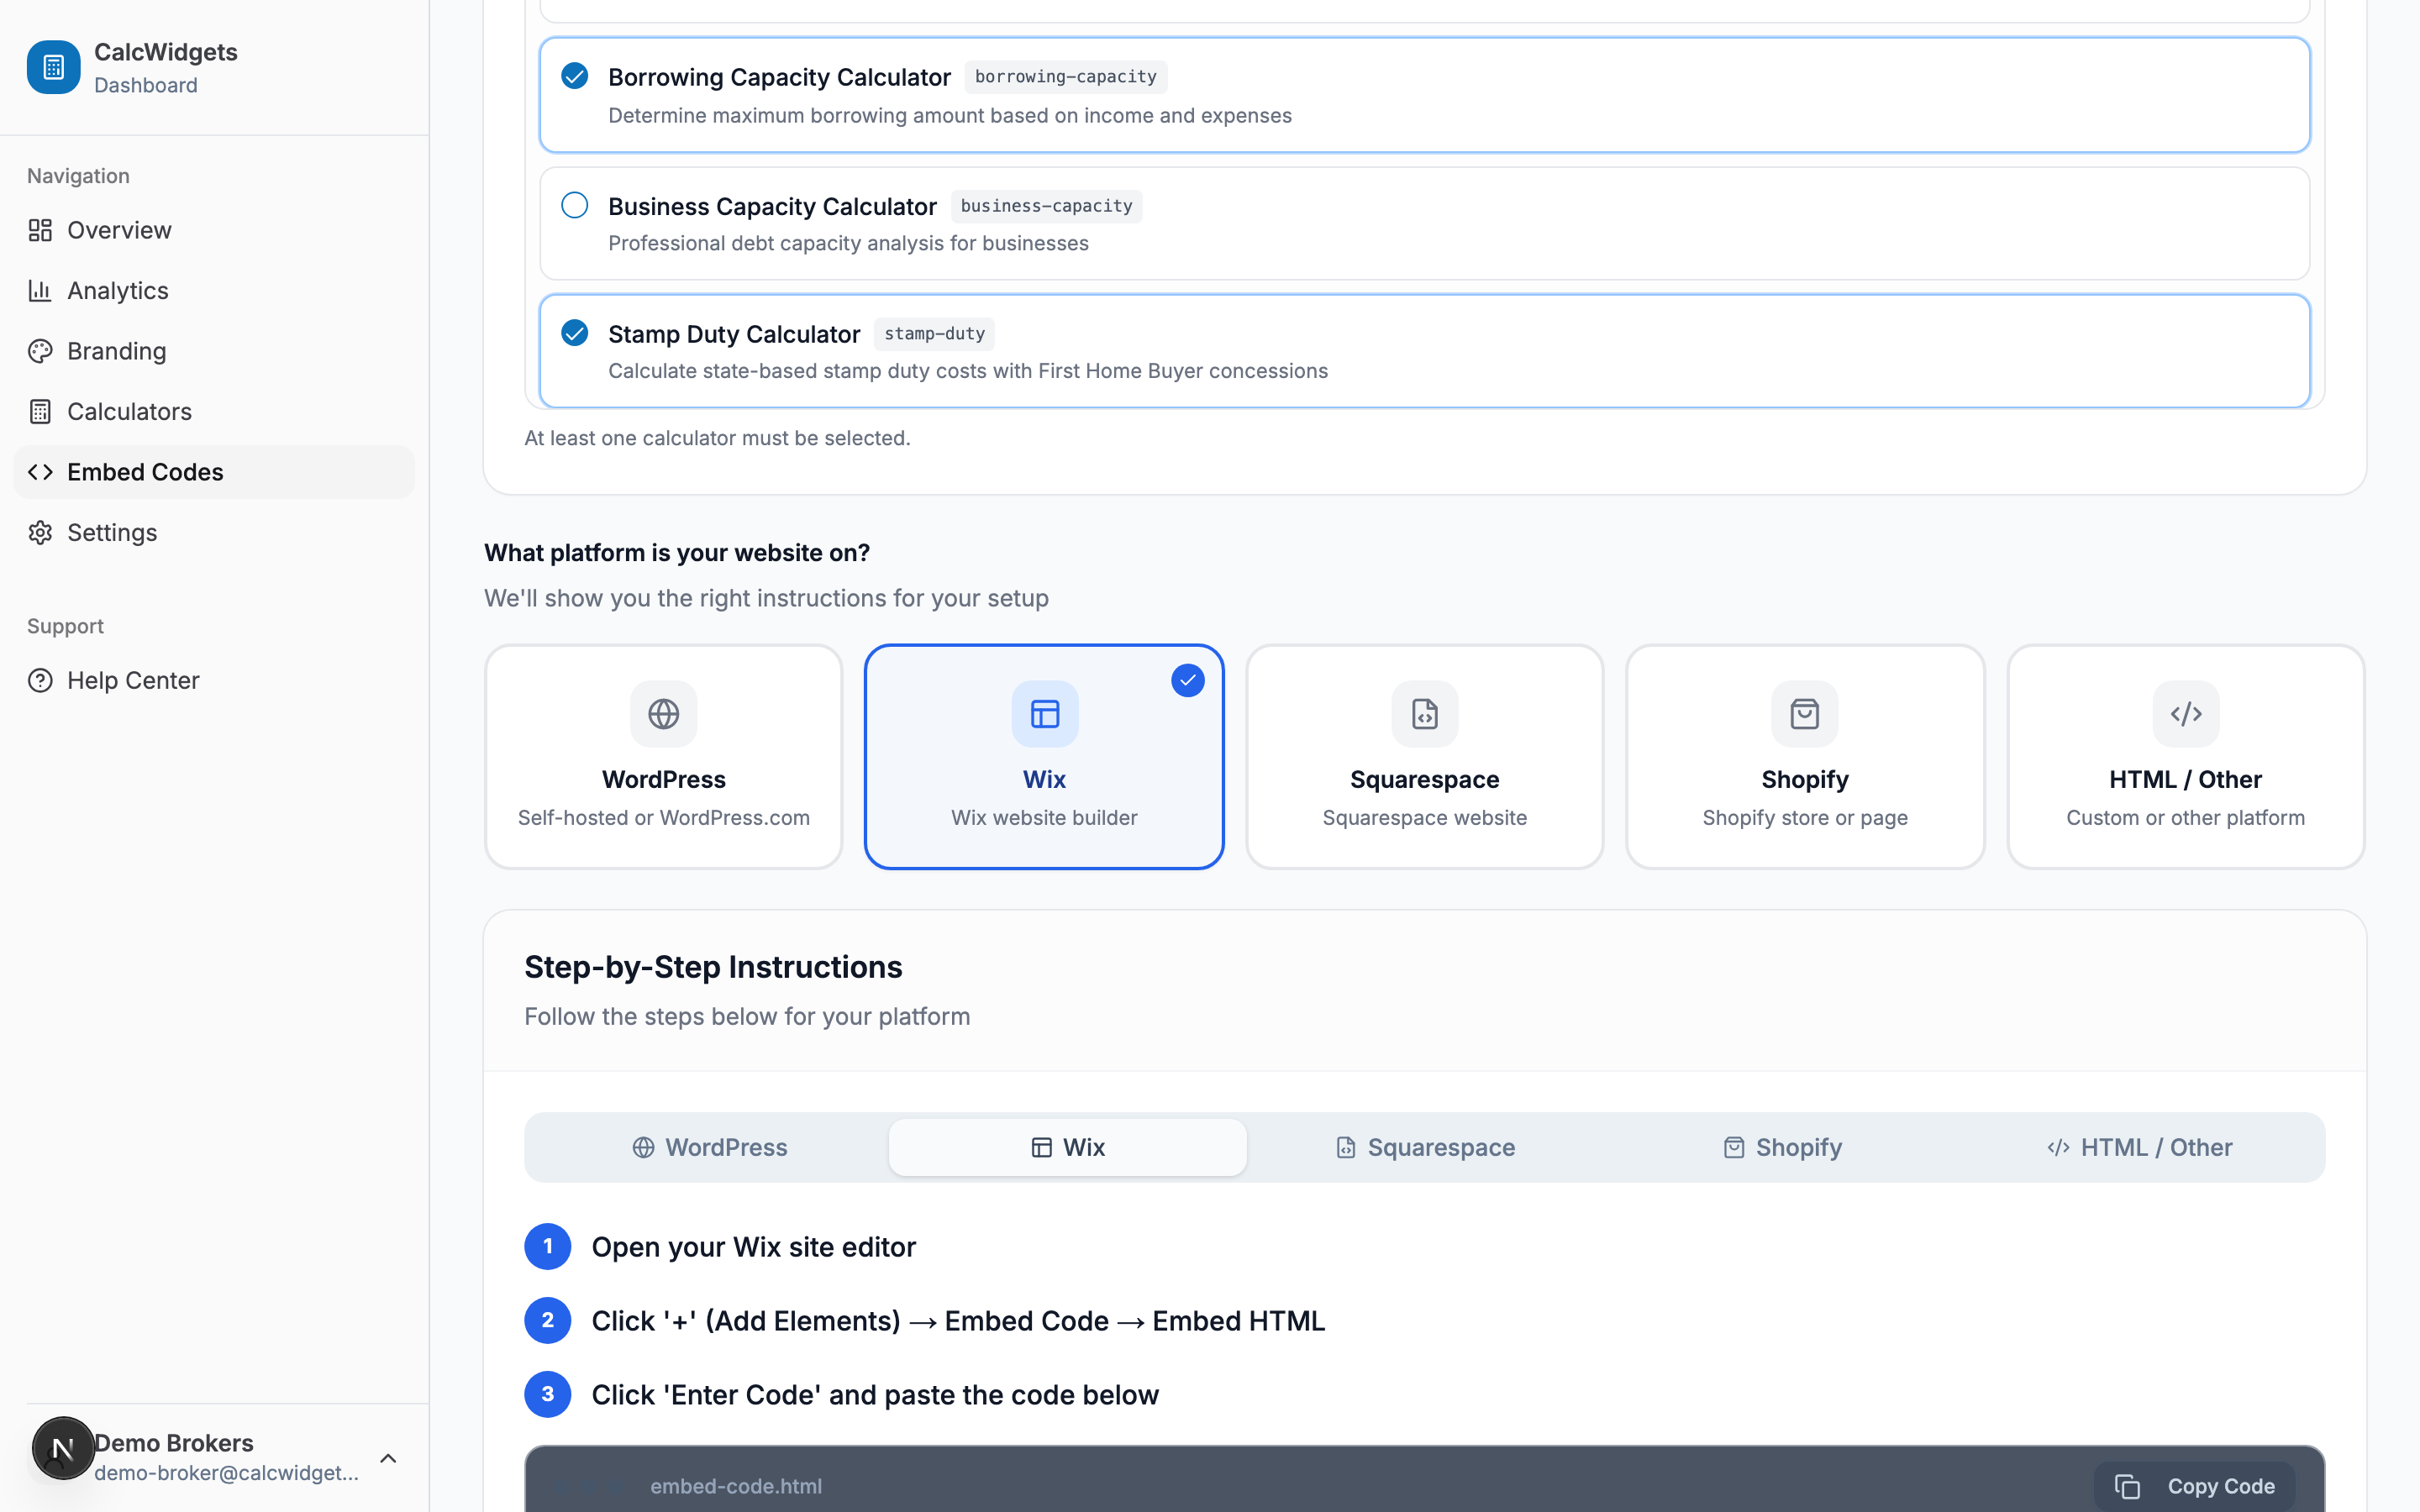
Five platform options, each with tailored install instructions:
- WordPress — the most common
- Wix — easy if you have a paid plan; limited if free
- Squarespace — needs Business plan or higher for embeds
- Shopify — works on every plan via the HTML toggle
- HTML / Other — for custom-coded sites, Webflow, Framer, Ghost, Notion, anything else
The instructions panel below adapts based on what you select. We save your platform choice to your account so it's pre-selected next time.
5d. Copy the embed code
Below the platform selector is the "Step-by-Step Instructions" panel with the per-platform copy-paste guide. The code block has a Copy Code button — clicking it puts the snippet on your clipboard.
There are three flavours of snippet, depending on the layout:
Standard iframe (for tabs, dropdown, stacked, single):
<iframe
  src="https://yoursubdomain.calcwidgets.com/embed?widgets=loan-repayment,stamp-duty&view=tab"
  width="100%"
  height="800"
  frameborder="0"
  id="calcwidgets-frame"
  title="Your Company Calculators"
  style="border: none;">
</iframe>
<script>
window.addEventListener('message', function(e) {
  if (e.data && e.data.type === 'calcwidgets-height') {
    document.getElementById('calcwidgets-frame').style.height = e.data.height + 'px';
  }
});
</script>
That <script> block is the auto-height handler. The iframe sends its rendered height via postMessage whenever the content changes (someone clicks a tab, opens a section, runs a calc and gets results), and the script resizes the iframe to fit — so no scrollbars and no wasted whitespace. Don't strip it.
JavaScript loader (alternative — same result, slightly different shape):
<div id="calcwidgets-container"
     data-client="yoursubdomain"
     data-widgets="loan-repayment,stamp-duty"
     data-view="tab"
     data-source="REPLACE_WITH_PAGE_SLUG"></div>
<script src="https://calcwidgets.com/embed.js"></script>
Use this if you want to control the wrapper element (give it your own classes, target it with your own CSS). Functionally identical to the iframe version.
Floating widget (only shown when you pick the Floating layout):
<!-- Your Company - CalcWidgets Floating Calculator -->
<script>
(function() {
  var iframe = document.createElement('iframe');
  iframe.src = 'https://yoursubdomain.calcwidgets.com/embed?widgets=loan-repayment&view=floating';
  iframe.style.cssText = 'position:fixed;bottom:0;right:0;width:100%;height:100%;border:0;z-index:9999;pointer-events:none;background:transparent;';
  iframe.id = 'calcwidgets-float';
  iframe.setAttribute('allow', 'same-origin');
  document.body.appendChild(iframe);
})();
</script>
This goes in your site-wide footer (so it appears on every page), not on an individual page.
5e. The live preview
Scroll down past the instructions and you'll see a Live Preview card with the calculator rendered as it will appear to your visitors. Use this to verify the layout and colours before you paste anything onto your website.
If you want to test on the real subdomain (with full URL routing, auto-height, the lot), click Open in new window — it opens your subdomain embed URL in a new tab.
Part 6 — Installing on your website
You've copied the embed code. Now you need to paste it somewhere your visitors will see it. Here's the playbook for each major platform.
WordPress
WordPress is the most common platform we land on, and the experience depends on which editor you use.
Gutenberg (block editor) — most common, all modern WordPress.
- Open the page where you want the calculator.
- Click + to add a block → search Custom HTML (or type
/html). - Paste the embed code from your dashboard.
- Click Publish or Update.
That's it. The auto-height script runs and the calculator sizes itself to fit.
Elementor.
- Edit the page with Elementor.
- Drag an HTML widget onto the page (under "General" in the elements panel).
- Paste the embed code into the HTML code field.
- Click Update.
Divi Builder.
- Edit the page with Divi.
- Insert Module → Code.
- Paste the embed code into Content → Code.
- Save.
Classic Editor.
- Open the page in Classic Editor.
- Switch to the Text tab (top-right of the editor — not Visual). This is the one people miss.
- Paste the embed code where you want the calculator.
- Click Update.
If you want to use a [calcwidgets] shortcode instead of pasting the iframe HTML every time, our shortcode guide has the snippet for functions.php.
Wix
The standard embed works on any paid Wix plan:
- Open your Wix editor.
- Click + (Add Elements) → Embed Code → Embed HTML.
- Click Enter Code and paste the embed code.
- Resize the element to fit your page width — drag the corners.
- Click Publish.
Two Wix-specific gotchas worth knowing about:
- The standard HTML Embed element doesn't always pass through the auto-height script reliably. If your calculator is showing a scrollbar or looks too short, either set a generous fixed height in the embed code (change
height="800"toheight="1200") or use the "Custom Embed" element instead. - Wix's preview mode can swallow iframe clicks. If the iframe shows up but inputs feel unresponsive, publish and test on the live URL — it's usually fine on the live site.
For the floating widget on Wix you need a Premium plan because it requires custom code injection via Settings → Custom Code (set placement to "Body - end", apply to all pages).
Squarespace
- Edit the page in Squarespace.
- Click + to add a section → choose Code (this requires Business or Commerce plan; Personal doesn't have Code blocks).
- Paste the embed code from your dashboard.
- Make sure Display Source is unchecked.
- Click Save.
If you're on the Personal plan and don't want to upgrade, you can use a link to your subdomain instead of an embed — paste https://yoursubdomain.calcwidgets.com/embed?widgets=loan-repayment&view=single as a button link. The visitor leaves your site briefly but lands on a full-page calculator with your branding.
For the floating widget: Settings → Advanced → Code Injection → paste the floating widget code into the Footer section.
Shopify
The easiest path works on every Shopify plan, including the basic one:
- Open your Shopify admin → Online Store → Pages.
- Click the page where you want the calculator (or Add page).
- In the editor toolbar, click the
< >(Show HTML) icon. The editor switches to raw HTML mode. - Paste the embed code where you want the calculator.
- Click Save.
The < > toggle is critical — without it, Shopify's rich-text editor escapes the iframe tags and you'll see the raw <iframe ...> markup on the live page instead of the calculator. This is the single biggest source of Shopify support emails we get; the fix is just to flip the HTML toggle.
For embedding inside an existing template (not a standalone page), use a Custom Liquid section in the theme editor. For site-wide installations (e.g. the floating widget on every page), edit theme.liquid and paste the script just before </body>.
Custom HTML / Webflow / Framer / Ghost / Notion / anything else
Most modern site builders have an "HTML embed" / "Custom code" / "Code block" element. Drop one onto the page and paste the embed code. That's it.
A few platform-specific notes:
- Webflow — use the Embed element (Layout panel → Embed). Webflow won't render embeds in the canvas preview; you have to publish to see them live.
- Framer — use the HTML Embed component. Framer renders embeds inline so you'll see them in the editor.
- Ghost — in the editor, add an HTML card (
/html) and paste. - Plain static HTML — just drop the embed code into your
.htmlfile. - Notion — Notion's
/embedblock doesn't run scripts, so the auto-height won't work. Use a generous fixed height (height="1500") or link to the full-page URL instead.
If your site has a strict Content Security Policy, you need to whitelist us:
frame-src https://*.calcwidgets.com;
Without this, the iframe will silently fail.
Part 7 — Verifying it works on the live site
Once you've pasted the embed and published the page, do these three checks:
-
Visit the page on your live URL (not preview/staging). Editor previews lie about iframes — Wix, Squarespace, and Shopify all behave differently in preview vs production.
-
Run an actual calculation. Punch a number into the loan amount field, hit calculate, watch the result appear. If results don't show, see the troubleshooting guide.
-
Test on mobile. Open the page on your phone. The calculator is mobile-first by design, but your surrounding page might have a parent container that's clipping it. If the calculator is squished, check your theme's content max-width and any padding/margins on the embed's parent element.
If everything looks right, you're done. The calculator will start logging usage to your analytics dashboard immediately — give it a day or two and you'll see real interaction data.
Part 8 — What gets tracked, and what doesn't
The first time visitors run a calculation on your embed, we record an anonymous event. Dashboard → Analytics shows you:
- Total calculator runs per day / week / month
- Which calculators get used most
- Which pages they were embedded on (using the optional
data-sourceparameter — set this on the script tag if you want per-page breakdown) - CTA click-through rate (how many people who finished a calculation clicked your CTA button)
We don't capture personal data — no inputs, no identifying info, no IP addresses stored beyond what's needed for the immediate request. The only thing we collect is what calculator was used, on what page, and whether the CTA was clicked. If you want full lead capture (name, email, phone before they see results), that's a different feature — see our lead capture article.
Part 9 — URL parameters you can use anywhere
The embed URL accepts a few parameters that let you do things without going back to the dashboard:
| Parameter | What it does | Examples |
|---|---|---|
widgets | Comma-separated calculator IDs to show | widgets=loan-repayment,stamp-duty |
view | Layout style | view=tab, view=stack, view=single, view=floating |
theme | Light or dark override | theme=light, theme=dark |
source | Page-level analytics tag | source=home, source=/refinance |
Examples of useful URLs:
# Just the loan repayment calculator on your home page, light theme
https://yoursubdomain.calcwidgets.com/embed?widgets=loan-repayment&view=single&theme=light

# Stamp duty calculator on a state-specific page, tagged for analytics
https://yoursubdomain.calcwidgets.com/embed?widgets=stamp-duty&view=single&source=nsw-stamp-duty-page

# Refi suite stacked on a refinance landing page
https://yoursubdomain.calcwidgets.com/embed?widgets=refinance,offset,extra-repayment&view=stack
If you find yourself repeatedly pasting the same URL with slightly different calculators per page, that's the right move — you don't need a dashboard round-trip every time.
Part 10 — Troubleshooting
Things that go wrong, in order of frequency:
"I pasted the code but nothing shows up." Almost always one of: (a) you used a regular paragraph block instead of an HTML embed block; (b) you're in Classic Editor's Visual tab instead of Text tab; (c) a security plugin (Wordfence, iThemes Security, Cloudflare) is stripping iframes — add *.calcwidgets.com to its allow-list.
"The calculator shows scrollbars / looks clipped at the bottom." The auto-height script isn't running. Most common cause is the platform stripping the <script> tag. Fix: set a generous fixed height="1200" on the iframe, or move the script to a site-wide header injection. See the auto-height guide.
"Inputs don't respond / the calculator looks frozen." Usually a preview-mode-only issue. Publish the page and test the live URL.
"My colours look wrong." Either you changed branding but didn't refresh the embedded page (browser cache), or your platform's wrapping CSS is overriding things. Hard-refresh (Cmd+Shift+R / Ctrl+Shift+R) first.
"My logo isn't showing." Check Dashboard → Branding: is the logo URL accessible publicly? If you pasted a URL pointing to a file behind WordPress's media library with a "private" flag, we can't fetch it.
"I want to change my subdomain." Email hello@calcwidgets.com with your current subdomain and the new one. We'll swap it and update your DNS within a business day. The old URL will redirect for 30 days.
"My account expired / I want to subscribe." Dashboard → Settings → Subscription. The trial is 14 days; subscription plans start at the price shown on our pricing page.
You're done
If you got this far and have a calculator live on your site, you've done the hard bit. The rest is fine-tuning — what calculators perform best on which pages, what CTA copy converts, what colour you eventually settle on once you've slept on it.
If you get stuck at any step, email hello@calcwidgets.com with a link to the page where you're embedding. Same-business-day response, real human, no chatbot.
And if you have ideas for calculators we don't have yet — or fields you wish a calculator collected — tell us. The most-used calculators on the platform today were originally requests from brokers like you.
Related Articles
First Home Super Saver Scheme (FHSS) Explained - 2026 Guide
How Australia's First Home Super Saver Scheme works: $15,000 per year and $50,000 total contribution limits, 85% vs 100% release rules, and how to fold FHSS into your deposit plan.
Help to Buy Scheme Australia: How It Works in 2026
How Australia's Help to Buy shared-equity scheme works - income caps, state price caps, the 2% deposit rule, and how to model your borrowing and deposit with free calculators.
How the new HECS-HELP marginal repayment system works from 2025-26, a worked $90,000 example, and how the monthly cost hits borrowing capacity.